Place text in quotation marks for exact match search results.
Using TSDE Import
Importing data refers to processes such as loading a file, text, or data prepared with
one application into another application while exporting data is the process of sending data
from one application to another application.
To open the Data Exchange screen, click Task > Data Exchange.
By default, the TSDE Import screen is displayed.
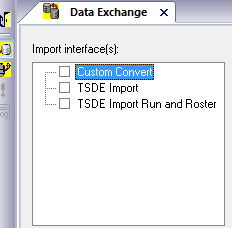
The Import interface(s) pane in the Data Exchange screen lists
three types.
Custom Convert - Allows you to convert data, which is in a
third party format, to Trapeze format in order that you can import the data.
TSDE Import - Allows you to import basic scheduling data such
as stops, lines, trips, and blocks.
TSDE Import Run and Roster - Allows you to import scheduling
data and runs and roster data.
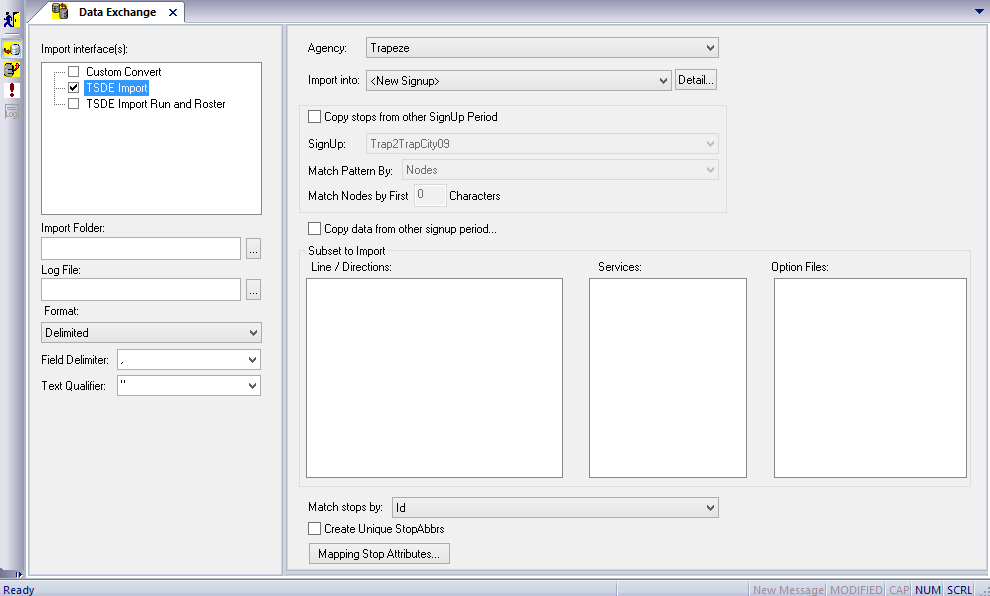
In the Import interface(s) pane, select the TSDE
Import check box.
Additional fields are shown on the right pane and below the Import interface(s)
pane.
Click the ellipsis button beside the Import Folder field.
The Browse for Folder dialog box appears.
Select the folder containing the files created in the export process, and then click
OK.
The Subset to Import frame in the right pane is filled in with the lines,
services, and other optional data contained in the selected files.
Click the ellipsis button beside the Log File field.
The Browse for Files or Folders dialog box appears. Create a log file for the import process. The path to the file is displayed.
In the Format drop-down list, select the appropriate format: Delimited, Fixed Width, or XML.
If you selected Delimited, the Delimiter and Text Qualifier fields are
activated.
From the Field Delimiter list, select the symbol to distinguish the fields. for
example, select comma (,) if the data is delimited by commas.
From the Text Qualifier list, select the appropriate mark. The double quotation marks
() is recommended.
(In a multi-agency environment) From the Agency list, select the agency from which you want to import data.
In the Import into drop-down list, select the sign-up period to which you want to import.
To import into a new sign-up period, choose <New
Signup>.
To import into an existing sign-up period, choose the sign-up period from the
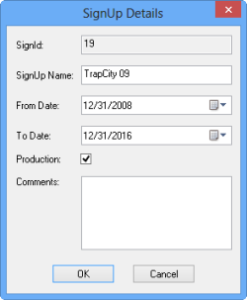
drop-down list. Click the Detail ellipsis button.
The SignUp Details dialog box displays information on the
selected sign-up period.
Change the From Date and Time Date if you only want data from a specific time period.
Type a comment in the Comments field as necessary. Click OK.
To copy stops data from another sign-up period:
On the right pane, select Copy stops from other Signup
Period. If selected, the system copies stops data from another sign-up
period. For example, choose this option if you require the stops data since you only
have exported nodes data.
In the Signup drop-down list, select the sign-up period from
which you want to copy.
In the Match Pattern By drop-down list, choose how you want
to identify the patterns from which the stops will be copied:
Nodes - Copy from patterns with the same nodes as the
pattern to which it is copied.
Pattern Name - Copy from patterns with the same pattern
name.
In the Match Nodes by First _ Characters field , type the
number of characters by which nodes are identified. For example, if the following node
names exist: ABCN, ABCS, ABCE, and ABCW and the field is set to 3, data of all the
nodes that start with ABC are copied. The system ignores the characters after the set
number.
Optional: To copy data other than stops from another sign-up period:
On the right pane, select Copy data from other signup period
- If selected, you can choose the data that you want to import in the Copy
data from other signup dialog box.
In the Signup drop-down list, select the sign-up period from
which you want to copy.
In the Copy Options drop-down list, select the data elements
that you want to copy and then, click OK.
Optional: To modify the subset of data to be imported, select or clear the
appropriate line/directions, services, or other options in the Subset to Import
pane.
In the Match Stop by drop-down list, select how you want the
stops matched: Id or Abbr. If the data being copied has an ID or Abbr that matches the
data it is being copied into, it overwrites the data.
Optional: Select Create Unique StopAbbrs to change names of duplicate Stop
Abbrs of the data being copied. For example, Stop EXPO for Line 1 and Stop EXPO for Line
10 are changed to Stop EXPO1 and Stop EXPO2, respectively.
A suffix is added to the abbreviations to make the stop abbreviation unique.
Click the Mapping Stop Attributes button.
The Mapping Stop Attributes dialog box is displayed. The
Attribute Name column shows the stop attributes from the source
data. The FieldName column contains Trapeze field names as in the
Stops table. The FieldLabel column contains the name of the field
as it appears in the Trapeze application.
Click a field in the FieldName column and select the appropriate
matching attribute from the list.
If supplementary information has been updated in the Trapeze application, that
is, user fields renamed, the field label is shown and can be selected from the Field Label
list. If the field name is selected from the FieldName list, the FieldLabel and FieldType
fields are automatically filled in.
After completing the list of attributes, click OK.
To save all of the import settings for future imports, click the Save button and save the ini file.
Optional: To load a set of saved import settings, click
Open and select an ini file.
To run the TSDE Import, click Execute Interfaces:
The data of the new sign-up period is loaded into the destination database.