The Itinerary wizard allows you to create manual itineraries for future use.
Open the Itinerary Planning screen.
On the Request tab of the Itinerary Planning screen, geocode the origin and destination for which you want to build an itinerary.
Open the Lines and Stops tab, and then click the Stop
Information button:
From the results, highlight a line and direction in the origin section. Confirm that you are selecting the correct direction by looking at your system map.
Click the Start Itinerary Wizard button:
Alternatively, right-click on the highlighted line and choose Itinerary
Wizard from the shortcut menu.
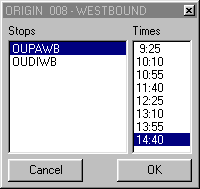
A dialog box appears showing a list of stops>nodes within the predefined
radius for the line you highlighted. The closest stop/node is shown first.
Click the appropriate stop/node. To change the departure time, use the scroll bar on
the right side of the screen and click on the departure time you want.
Click OK.
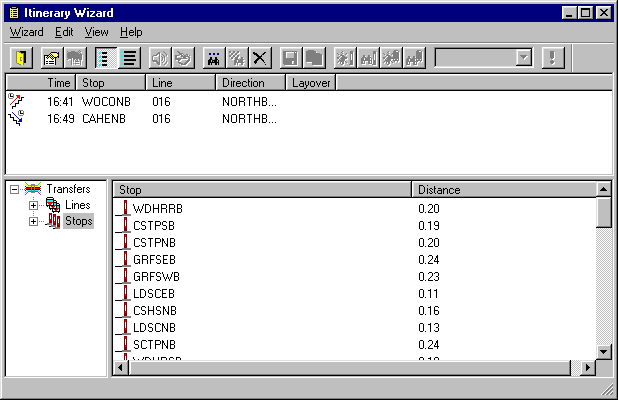
The Itinerary Wizard screen appears.
Note that your selection appears horizontally in the top half of the dialog box.
The layout of the columns: Time, Stop, Line, Direction, and Layover is similar to the
Details tab of the Itinerary Planning screen.
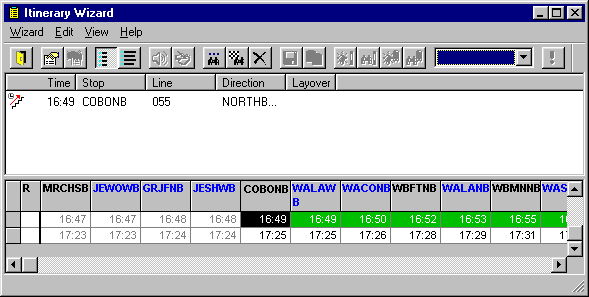
The lower half of the Itinerary
wizard screen shows a headway sheet for the line that you selected. The system displays
stops and nodes horizontally across the top of the headway sheet. Stops are listed in
blue text and nodes listed in black.
The departure time you selected appears on
the headway sheet in a black box with white text in the headway sheet. The same
departure time is shown on the top half of the screen.
See Color Codes for a description of the color codes used in the headway
sheet.
Scroll to the right of the departure time, and select the stop time that you want to be
the final point of the first leg.
Empty colored fields to the right indicate that there are still times available
further along the trip. Fields with a *[T] symbol indicate there are no times for the stop
on this trip; however, it is still a predefined transfer point. You do not necessarily
have to pick a pre-defined transfer. If you choose a regular stop, then the system uses
distances between stops to calculate possible transfers.
Double-click the time for the final point. Alternatively, click the Continue
button:
The lower half of the screen changes to the Connections
view.
Choose the next leg of the itinerary in the lower half of the screen.
The top half of the screen now has the new leg added to it. As the itinerary is
built, a red Board icon and a blue Alight
icon appear to the left of the trip times listed across the top of the screen.
The lower half of the screen is divided into two sections. The left pane shows Transfers
and the right pane shows details of the item you highlight on the left side.
Double-click the red and blue Lines button and all available routes are displayed vertically in the lower right section.
Connecting lines leading to the destination are displayed with a green border.
Lines that do not directly lead you to your destination appear in red and blue without a
green border. The line currently used to build the itinerary is shown in
gray.
To select the connecting line in the bottom left screen, double-click it.
Select the appropriate direction of travel for the line selected.
A green border again highlights directions that lead to the destination.
Double-click the appropriate direction.
Select a bus stop or node. Double-click the appropriate stop or node. The system requests that you select a connecting trip in the lower right screen.
The red icon to the left of the trip time in the View Modes
screen indicates that a connection can be made with the first leg of the
itinerary.
Highlight the appropriate trip time then click on the Continue icon or double-click the trip time to select it.
The trip again appears in the top half of the screen and the applicable headway
sheet appears in the lower half of the View Modes screen. The trip
time selected is shown in black on the headway sheet.
Scroll to the right on the headway sheet.
The stop or node of the final destination is highlighted in green.
Highlight the trip time.
Continue adding legs until your itinerary is complete.
Click the Finish button:
If you have administrative rights you can save the itinerary, click the
Save button:
Alternatively, to copy the itinerary to the clipboard, click the Copy
Itinerary to Clipboard button:


 The lower half of the screen changes to the Connections view.