Place text in quotation marks for exact match search results.
Searching For Fixed Route Data
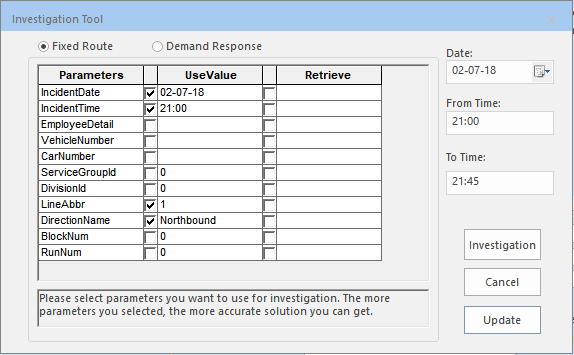
Filters are shown in the Parameters column of the
Investigation Tool dialog box and are the data elements that the
Investigation Tool uses when searching for Fixed Route data.
The Use Value column shows the input criteria. If the applicable
schedule is found and selected, the appropriate check boxes are selected and data is shown on
the Retrieve column.
In the COM Representative or COM Investigator
screen, ensure all available data is entered in the feedback entry such as sign-up period,
route, route direction, stop, scheduled time, vehicle ID, and employee ID.
Type the Incident Start time.
This establishes the search window when looking for driver events.
Click the Investigation Tool button: .
Click the Fixed Route option.
The option may be selected by default as defined in the COM/Customers
Feedback settings/Default Investigation Tool context property.
Select the parameters that you want to apply in searching for the data you need. (Some of the parameters may be marked depending on what has been set as the default in the Context properties and the data you have previously entered.)
The fewer parameters you select, the broader the range of solutions that may be returned by the system. The more parameters you select, the narrower the range of solutions provided.
Optional: Adjust the From Time and the To Time
fields if required. These determine the time frame or search window for driver events.
Click Investigation.
The Select Desired Solution dialog box appears with
possible matches within the timeframe or search window.
Tip: If no matches are returned, change the input criteria and try
again.
Click the solution you want and click OK.
The schedule information from the selected solution is copied to the
Retrieve column of the Investigator Tool. The following graphic
illustrates the Investigation Tool when a solution is selected.
Additional data is provided in the Retrieve column. Among the
data shown are the block and run numbers, employee details, and vehicle number.
Optional: If the data is sufficient, click Update. You can deselect the
fields in the Retrieve column that you do not wish to update.
The data from the selected fields is entered into the appropriate
Subject fields in the COM Representative or
COM Investigator screen.
Note: The Update button appears shaded if you do not have the
security right to overwrite the Subject fields.
 .
.
 Tip: If no matches are returned, change the input criteria and try again.