Archiving and Deleting Data Using the Archive Assistant
Using the Archive Assistant, you can save data from your production database in an archive database.
About this task
When you close the Archive Assistant, the settings are saved for next time you use the Archive Assistant.
Procedure
-
Navigate to and double-click MMSArchiveAssistant.exe.
Typically, MMSArchiveAssistant.exe will be in the same location as Mmsw41.exe (that is, the Trapeze4 Workstation executable file).The Login dialog box appears.
-
Type a Login name and Password.
Config DSN and Profile information should match that for the database being archived.
-
Click OK.
MMSArchiveAssistant appears.
- In the Source DSN list, click the database from which you want to archive data.
-
In the Source DSN User and Password
fields, type the user name and password.
Additional information appears in the dialog box:
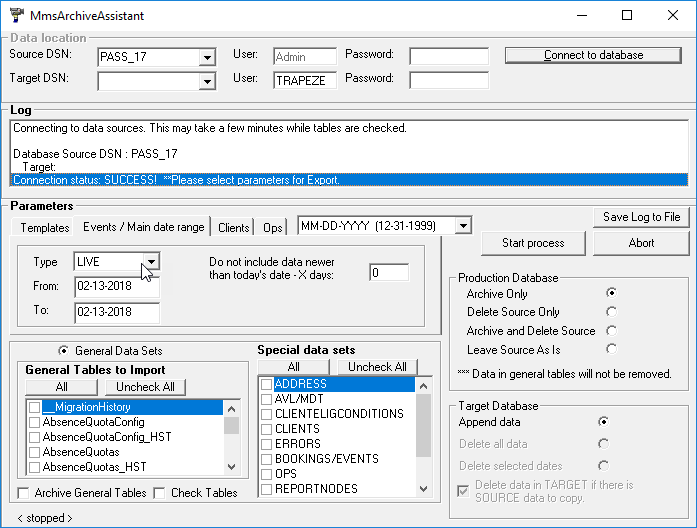
- In the Target DSN list, click the database where you want to save the archived data.
- In the Target DSN User and Password fields, type the user name and password.
- Click Connect to Database.
-
If the Select Data Source dialog box appears, click the data
source name, and then click OK.
If the target database does not match the source database, the log area lists any issues. If the database connection is successful, parameters appear in the screen.
-
On the Events/Main Date Range tab, choose the type of events
that you want to archive in the Type list.
In the From and To fields, specify the date range for which you want to archive data. You cannot archive data for dates within the number of days specified by the Do Not Include Data Newer Than Today’s Date - X Days field. If the value is zero (0), you can archive data for any dates. The value in this field is determined by the Archive Dates Only Older Than # Days system property.
- Optional: To specify which schedule type is considered to be a template, on the Template tab, choose a schedule type in the Type list.
- Optional:
On the Clients tab, do one or more of the following:
- To limit archiving of client records to clients who are inactive, select the Inactive check box.
- To limit archiving of client records to clients whose last trips are before a certain date, specify the date in the Last Trip Date Earlier Than field.
-
If you have selected one or both of the previous options, and you want to remove the specified client data from the source database, select the Remove All Client Data from Source check box. If you select the Remove All Client Data from Source check box, data is removed from the following tables:
CLIENTS; CLIENTACCOUNTTRANSACTION; CERTIFICATIONACTIVITY; CERTIFICATIONAPPT; CERTIFICATIONCDOCS; CERTIFICATIONLOG; CERTIFICATIONCLIENTS; CLIENTELIGCONDITIONS; CLIENTFUNDINGSOURCE; CLIENTGROUPBOOKING; CLIENTPROVIDERS; COMFEEDBACK; CSFEEDBACK; ELIGIBILITYPOLYGONS; IVRCALLBACKLOG; IVRCALLOUT; SCHEDLOG SUSPENSIONFILE.
- Optional:
On the Ops tab, do one or more of the following:
- To specify a range of dates for archiving data, type a date range in the
From and To fields.Note: The date range is used in archiving data in the following tables: BIDLINEBIDUNIT; BIDLINEDAYOFF; BIDLINEEMPLOYEE; BIDLINEVACATIONRELIEF; BIDLINEWORK; BIDPERIODDATES; DAILYBLOCKS; EMPLOYEECERTIFICATION; EMPLOYEEDAYOFFMIRROR; EMPLOYEESTATUS; MISSINGQUALIFICATIONS; OPSEMPLOYEEVIOLATION; OPSEMPLOYEEWAIVER; QUOTAOFFDAY; QUOTAVACATION; REMARKVALIDITY; ROTA; ROTALINEEMPLOYEE; ROTAROLLOUT; RQATTRIBUTESETS; TKABSENCES; TKEMPLOYEEWAIVER; TKEXTRAWORK; VEHICLEMAINTENANCE; VEHICLESTATUS.
- To specify a maximum date for archiving data, type the date in the
Single Max Date field.Note: The maximum date is used in archiving data in the following tables: EMPLOYEEACCRUALIMPORT; EMPLOYEEALLOWANCE; EMPLOYEEATTRIBUTEIMPORT; EMPLOYEEEQUIPMENT; EMPLOYEEIMPORT; EMPLOYEEMEDICALTEST; OPSCONSISTS; OPSEMPLOYEEMESSAGE; OPSSIGNINLOG; PARKING; TKACCIDENTS; TKACCRUALBALANCE; TKACCRUALSELLBACKS; TKCALENDAR; TKDISPATCHLOG; TKEMPLOYEEINCIDENTS; TKEXTRAEMPLOYEES; TKLABORINTERFACE; TKPAY; TKPAYEXTRABOARD; TKWORK; TKEXTRAPAY; TKMISCONDUCT.
- To specify a range of dates for archiving data, type a date range in the
From and To fields.
-
In the Special Data Sets frame, select the check box for each
data set that you want to archive.
Note: If you select Templates in the Special Data Sets frame, the system archives template schedules. If you are deleting the template schedules from the production database, you probably do not need to archive the subscriptions. Clear this check box. If you select the Events check box, the events use the schedule type and dates specified on the Events tab. AVL/MDT and TRACKERLOG also follow the specified dates. When you select Booking/Events, tracker log records pertaining to the booking and events are also archived.
- Optional: In the General Tables to Import frame, select the Archive General Tables check box, and then select the check box for each table that you want to import.
-
In the Production Database frame, do one of the following:
- To archive the specified data without deleting data from the production database, select the Archive Only check box.
- To archive the specified data and then delete it from the production database, select the Archive and Delete Source check box.
- To delete the specified data from the production database without copying it to
the archive database, select the Delete Source Only check box.Note:
If this option is selected, the system only deletes records from the production database if the target database has the same records on every date in the date range. The system then deletes date-sensitive tables under the selected special data sets.
This option could be appropriate if you already archived the data. Otherwise, be careful with this option.
- To delete data from the Target database, select the Leave Source As Is option.
-
In the Target Database frame, do one of the following:
- To append the archived data to the existing archive database, select the
Archive Only option.Note: This option is not available if you select Leave Source As Is in the Production Database frame.
- To delete all data from the archive database, select the Delete All Data check box or the Delete Data in Target if There is Source Data to Copy check box.
- To append the archived data to the existing archive database, select the
Archive Only option.
-
Click Start Process.
The system processes the specified data. The Log area shows the progress.
- Optional: To stop the process, click Abort.
- Optional: To view the log in a text file, click Save Log to File.