Configuring Trapeze Reports SetUp Properties

Before working with PASS standard reports, you must define the formats and parameters that will be used by the system when it creates reports.

Before you begin

The Trapeze Reports module must be open.

About this task

The System Setup dialog box is also used to define route error report criteria.

Procedure

  1. Click File > SetUp.
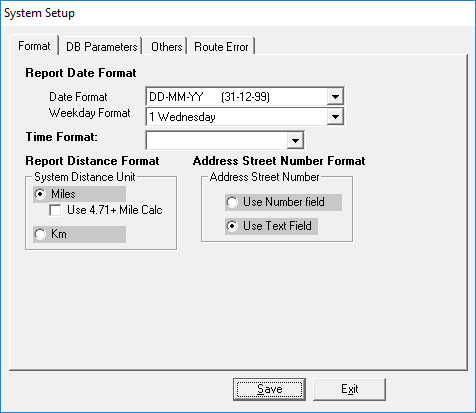
    The System Setup dialog box Format tab appears.
    The System Setup dialog box open to the Format tab.
  2. Select the appropriate output format for the report date, week days, time, report distance, and address street number.
    If 4.71 + Mile Calc is selected, 1609.344 is used for mileage conversion (from meters). Otherwise, 1609 is used.
    If Use Number field is selected, the address street number is pulled from the StreetNum field in the database. If Use Text Field is selected, the address street number is pulled from the StreetNo field in the database.
  3. Click the DB Parameters tab.

    The System Setup dialog box open to the DB Parameters tab.
  4. Do the following:
    1. In the Default Denial Type frame, type the booking subtype abbreviation that you want the system to count as denials for each denial type.
      Only one booking subtype can be specified.
    2. In the Default Sort Time frame, select the time that you want as the default sort time.
    3. In the Will-Call Subtype field, click the subtype to be used for report hours calculation.
    4. In the Late Time Threshold frame, type the number of seconds grace for report data.
      Reports affected by this value include On Time Compliance, On Time Compliance (Flex), Late Trip Summary by Provider, and Same Day Advance Booking.
    5. In the Default Types frame, select the Client Type, PCA Type (Personal Care Attendant type), and ESC Type (Escort type).
      Available options are defined in Passenger Types ancillary data.
    6. Select any deadhead options to be used when creating reports.
      • Pullout Deadhead, which includes break dwell time with deadhead time to determine total pull-out deadhead time.
      • Pullin Deadhead, which includes break dwell time with deadhead time to determine total pull-in deadhead time.
      • Total Deadhead, which includes in-service deadhead time in the total deadhead time. If this option is selected, select whether In-Service Deadhead time should include break dwell time in the total deadhead time.
      If deadhead options are cleared, then deadheads are reported in the traditional manner (pull-out deadhead times and pull-in deadhead times do not include breaks times and total deadhead times do not include in-service deadhead times).
      Deadhead preferences are used in the Route Productivity report, Provider Productivity report, and Funding Source Productivity report.
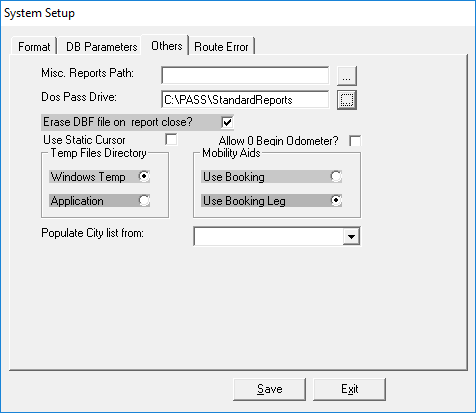
  5. Click the Others tab.
    Additional set up options appear.
    The System Setup dialog box open to the Others tab.
  6. Perform the following steps as required:
    1. Click the ellipsis button (…) beside the Misc. Reports Path field.
      The Select Misc. Reports Path dialog box appears.
    2. Navigate to and select the path where user-defined reports should be saved.
    3. Click OK.
    4. Click the ellipsis button (…) beside the Dos Pass Drive field.
      The Select Dos Pass Drive dialog box appears.
    5. Navigate to and select the path where intermediate *.dbf files should be stored.
      *.dbf files are intermediate versions of the database generated when running PASS Standard reports.
    6. Click OK.
  7. Optional: To ensure that the *.dbf file is removed after the report is completed, leave the Erase DBF file on report close check box selected.
  8. Leave the Use Static Cursor check box cleared.
    This option determines how to fetch data from the database. If checked, rdOpenStatic is used. If cleared, rdOpenKeyset is used.

    For better data security, Trapeze recommends using rdOpenKeyset.

  9. Optional: To begin the odometer reading at zero, select the Allow 0 Begin Odometer check box.
    Selecting this option alerts the system to the fact that a 0 value is expected. If this option is cleared, odometer readings with a 0 value will be handled as a data error and not included in mileage calculations.
  10. Select the folder where the *.dbf file should be saved:
    • Windows Temp (the Windows directory)
    • Application (PASS Reports folder)
  11. Select the table to pull mobility aid information from:
    • Use Booking pulls information from the Booking table.
    • Use Booking Leg pulls information from the BookingLegs table.
  12. In the Populate City from list, click the table from which you want the reports to draw city names:
    • Address
    • Events
    • Map place (MapPLC)
  13. Click the Route Error tab.
  14. Define the appropriate values and settings for running the Route Error List report.
  15. Click Save.
    A You need to re-login to apply changes to the database properties. Relogin now? message appears.
  16. Click Yes.
  17. Confirm your log in details.
  18. Click OK.