Place text in quotation marks for exact match search results.
Adding Ride Check Data Manually
You can enter the ride check data manually using the Check Edit - Ride
Check dialog box.
On the Trips tab, select a record with a ride check and click the
Edit button: .
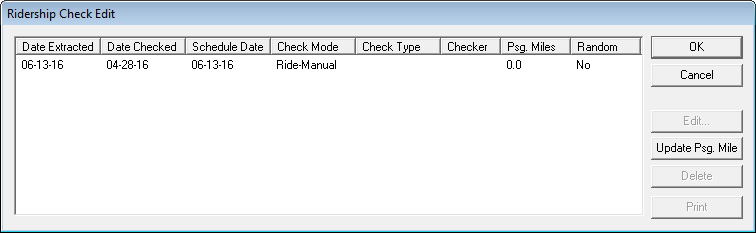
The Ridership Check Edit dialog box appears.
Double-click the appropriate extraction or click Edit.
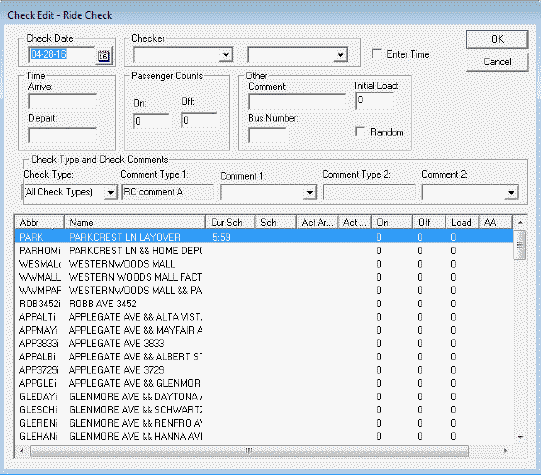
The Check Edit - Ride Check dialog box appears.
If you have raw passenger count data from automatic checks performed in PLAN Gateway,
it is displayed in the Raw On and Raw
Off columns. These columns are only displayed if this data is
available.
In the Check Date field, do one of the following steps:
Type the appropriate date.
Click the Calendar button beside the field and select a
date from the calendar.
In the Checker frame, from the Employee
Type drop-down list, select the employee type you wish to assign as
checker.
The names of employees under the selected type are shown on the Employee
Type drop-down list.
Optional: In the Other frame, type comments in the
Comment field.
Optional: To type Arrive and Depart times quickly for several successive
nodes/stops:
In the Passenger Counts frame, place the cursor in the
Off field and select the Enter Time
check box.
In the Off field, type the number of passengers that
alighted from the vehicle and press ENTER.
The cursor moves to the On field.
In the On field, type the number of passengers who boarded
the vehicle and press ENTER.
The cursor moves to the Arrive field.
In the Arrive field of the Time frame,
type the time the vehicle arrived and press ENTER.
The cursor moves to the Depart field.
In the Depart field, type the time the vehicle departed the
node/stop and press ENTER.
The cursor goes back to the Off field.
Select the next node or stop in the list in the lower section of the dialog box and
repeat step 6. If the Enter Time check box is clear, the
cursor only moves between the Off and On
fields when you press ENTER.
Optional: Perform the following steps as necessary:
If the trip is a Random Sample trip, select the Random check
box.
Trips selected by the random sample process are automatically checked as Random
trips. However, if you used some alternative random sample selection at your site or
if a new ride check extraction was created for the trip after the random sample
extraction, you must select this check box. When the Random check box is selected, the
system recognizes the trip when you run NTD reports.
In the Bus Number field, type the number of the
vehicle.
In the Initial Load field, type the number of passengers
remaining on the bus from the previous trip.
This value is placed in the top row of the Load
column in the Check Edit-Ride Check dialog box. The load value
varies as boarding and alighting values are typed.
In the Check Type and Check Comments
frame, add comments by selecting options in the Comment Type 1
and Comment Type 2 lists.
If you have not created Comment Types ancillary data, the Comment Type fields will
be empty.
Click OK.
A message appears asking if you want to save and exit data entry.
Click Yes.
The data is saved and the passenger miles are automatically calculated for the trip.
 .
The Ridership Check Edit dialog box appears.
.
The Ridership Check Edit dialog box appears.