Cloning Daily Template or Live Runs
A live run can be cloned from an existing template run or from another live run. Similarly, a template run can be cloned from another template run or a live run.
Before you begin
About this task
Procedure
- Select the Daily option.
- Click the ellipsis button (…) next to the Schedule field.
- In the Select Schedule dialog box, select the schedule Type: Template or Live.
- In the Schedule field, choose the day (for example, Tuesday) or date (for example, 05-04-19).
- Click OK.
-
In Runs, click Display.
The template or live runs are shown in the grid.
-
Highlight the runs to be cloned and then click the Clone
button:

The Clone Runs dialog box appears.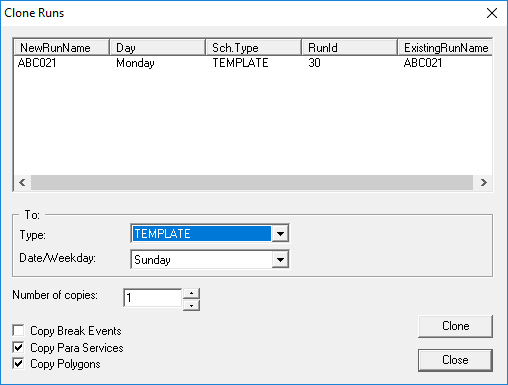
- Optional:
To rename the run, do one of the following:
- Click the run name in the NewRunName column and type a new name.
- Click the run name, press F2, and type a new name.
-
In the To frame, do one of the following:
- In the Type list, click Template. In the Date/Weekday list, select the week day for which to create the cloned runs.
- In the Type list, click Live. In the Date/Weekday list, select the schedule date for which to create the cloned runs.
-
Provide the following information as required:
-
Click Clone.
A confirmation dialog box appears.
-
Click Yes.
A message appears, stating that the run was cloned.
- Click OK.
- In the Clone Runs dialog box, click Close.
-
Press F5.
The screen is refreshed. The new runs are added to the template or live schedule to which they were copied.