Place text in quotation marks for exact match search results.
Extracting Trips for Point Checks
Point checks are performed at a location within the service area; usually a node that
services more than one route.
The checker monitors on time performance of one or more vehicles passing the stop as well
as boardings and alightings occurring at the selected point.
You can assign work to specific checkers and then provide them with the count sheets or (if
you are using hand-held computers) hand-held files necessary for them to execute the check.
Use point checks to analyze transit activity at a particular node in your service area. A
checker is placed at a selected point to monitor on time performance, passenger loads,
boardings, and alightings that occur at that point. A point check may focus on one line or
include all lines passing through the selected point.
Do one of the following steps:
Click Ridership > Extract Point Checks.
Click the Extract Point Check button: .
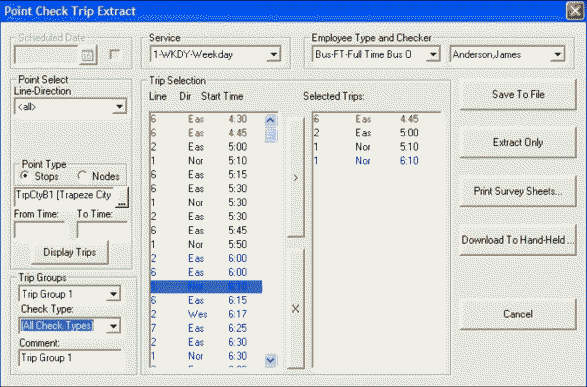
The Point Check Trip Extraction dialog box appears.
Select a service.
Optional: In the Employee Type and Checker frame, select the person who is
assigned to perform the point check.
In the Line-Direction drop-down list of the Point
Select frame, do one of the following steps:
To check all lines that pass a specific point, select
<all>.
To check only one route passing through a point, select the route number and
direction.
In the blank field in the Point Type frame, type the point that
will be checked by doing either one of the following steps:
Type the first character (letter or number) of the time point abbreviation.
A list of time points appears with all the time points that start with that
character.
Choose the appropriate time point from the list.
Type a forward slash (/) to display all time points (nodes).
From this list, double-click the appropriate time point.
Note: If the list is long, type the first character (letter or number) of the time point
abbreviation. This highlights the next time point that starts with that character.
Continue to type that character until you reach the time point that you want.
In the From Time and To Time fields, type
the appropriate times to narrow down the trip list and then click Display
Trips.
All trips for the specified line direction and their arrival times are displayed in
the left column of the Trip Selection frame. Only the trips with
arrival times that fall within the time range are displayed. If no times are typed, all
trips for the chosen point are displayed.
Optional: In the Trip Groups frame, select a trip group, select a check
type, and/or type a comment.
Optional: If you change the From Time or To Time
values, click Display Trips to refresh the trip selection
display.
Note: Trips may appear in different colors in the Trip Selection
list. These colors denote the ride check status of the trips and are not relevant to the
point check extraction process.
In the Trip Selection frame, select the trip or trips to be
extracted by doing one of the following steps:
To select one trip, click the trip you want.
To select multiple adjacent trips:
Press SHIFT and click the first and last trip that you want
to include.
Select the first trip, and then drag the pointer to the last trip that you want to
include.
To select multiple non-adjacent trips, press CTRL and click
each trip that you want to include.
To move the selected trips to the right column, click the Add
(>) button.
Optional: To remove a trip from the right column, select the trip and then, click the
Remove (X) button.
Click one of the following options:
Save To File: To download the data to a hand-held device
remotely. (For Citrix users)
Extract Only: To extract the file only; you do not need to
print out a survey sheet or download to a hand-held computer.
Print Survey Sheets: To extract the trip and print out a
survey sheet for collecting ride data manually.
Download To Hand-Held: To extract the trip and download the
file to a hand-held device for collecting the ride data electronically.
 .
.