Linking Client Trips from Trip Administration
You can link live trips (that is, activated and casual) that occur on the same day or trips that occur on different days.
Before you begin
About this task
Procedure
- Use the Client, From Date, and To Date search filters to locate the trips to be linked.
- Click Display.
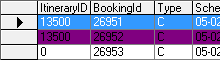
- Highlight the trips to be linked.
-
Click the Link Trips button:

The Link Trips dialog box appears. -
Highlight a trip and click the Up and
Down buttons to move it trips so that it appears in the correct
sequence.
Trips occurring first should be at the top and successive trips should follow in the correct order. When trips are not in the correct sequence, the Schedule Server cannot generate appropriate itinerary solutions when batch scheduling or single-insert scheduling. For trips that may not have request times and with minimum and/or maximum duration of stay specified, this is particularly important.
-
Click Link.
A message confirms the linking operation.
-
Click Yes.
The trips are linked and the Link Trips dialog box closes.
Results