Adding Bus Stops
When creating a record for a new bus stop, you can add information about it on the Select tab.
-
In the Bus Stops screen, perform one of the following steps:
- Click
- Right-click anywhere on the Select tab and in the shortcut menu, click Add.
- Click the Add New button:

The Details tab appears. The Stop Id field displays a new number. When creating a record for a new bus stop, you can add the main pieces of information about it on the Details tab.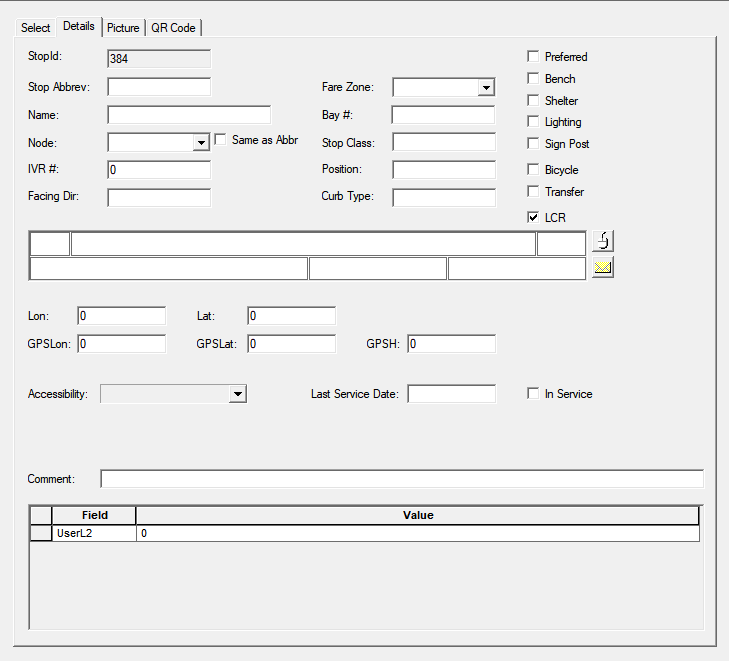
- Optional:
In the Agency list, click the appropriate
agency associated with the bus stop.
If the Stops and Nodes have no agency context property has been selected, the Agency field is not shown on the Details tab.
- In the Stop Abbrev (Stop Abbreviation) field, type the abbreviation you want to assign to the stop.
-
In the Name field, type the full name or a description of the
stop. The field can display up to 60 characters.
To use the Abbrev as the name of the stop, click the Same as Abbr check box beside the Name field.
- From the Node list, select the node you want to associate with the stop.
- In the Address fields, type the address of the stop.
- Optional: Geocode the stop.
-
(If Known)
Type the appropriate information in the following fields:
- GPSLon - Longitude of the stop
- GPSLat - Latitude of the stop
- GPSH - Height (altitude) of the stop
- In the Accessibility list, select the applicable accessibility type for the stop.
- Optional: If the stop is used in the current context, select the In Service check box.
- Optional: In the Last Service Date field, type the date when the stop was last maintained.
- In the Comment field, type any comment you have about the stop.
-
Click the Save button:
 The Lon (Longitude) and Lat (Latitude) fields show the Lon and Lat values on the status bar when the record is saved.
 -
To view the stop on the map based on the longitude and latitude or GPS coordinates:
- Click the ShowLatLon button:

- Click the ShowGPSLatLon button:

- Click the ShowLatLon button: