Installing PASS-IPA for INFO-Agent

When Trapeze INFO-Agent software is used for trip planning, the following steps should be taken to set up PASS-IPA.

Before you begin

The localhost.profile file should be updated with the needed PASS-IPA services.

Procedure

  1. In the Trapeze4 Workstation, click Tools > System Properties. On the Profile tab, click PASS Booking Client > Use Booking Validation Service.
    If PASS-Web or PASS-IVR are used to book trips, set this property to Yes. Otherwise, set the property to No.
    This document assumes that Trapeze4 is being used (that the property is set to No).

    If Trapeze6 is used, then many of the property settings described in Trapeze4 must be set in Trapeze6 because that is where the booking validation service gets its context properties.

  2. Update user-defined properties:
    1. Click Task > Trip Booking.
    2. Click File > Properties.
    3. On the Booking Screen tab, set Trip Plan Analyzer to Yes.
      This loads bookings into the Trip Plan Analyzer Wizard when they are saved.
    4. To automatically call the itinerary planner, set Auto FX Itineraries to Yes.
  3. Configure CTM Server:
    1. In the TP4 folder, launch CtmSrv41.exe.
    2. Click File > Configure.
    3. Confirm that the Server Name, correct database (Data Source), and correct sign up period (in the Cache frame) are selected.
    4. Select Load Cache.
    5. In the Trapeze4 Workstation, click Tools > System Properties and, on the Profile tab, click CTM Server > Network Address.
  4. Configure Trapeze6 properties (also known as context properties):
    1. Open the Trapeze6 Client Shell.
    2. Open Properties.
      Typically, this is found under Tools > Properties, but may be found elsewhere depending on the system setup.
    3. Navigate to INFO > InfoPTP > T4CTMServer, define the IP address and Port where the Trapeze6 Service Shell should try to communicate with the CTM Server.
  5. Edit the TpNet.ini file to include CTM Server information.
    For example: CTMSRV.PASS_16 TRP-J05688 localhost 11020 tcp
  6. Enable the Solution Generator.

To be able to set up PASS-IPA properly, it is important to understand the relationship of solution sets, solutions, and parameter sets. A solution set can have several individual solutions (for example, for walking, driving, transit), although PASS-IPA will only have one solution (transit). In turn, each solution is associated with a parameter set.

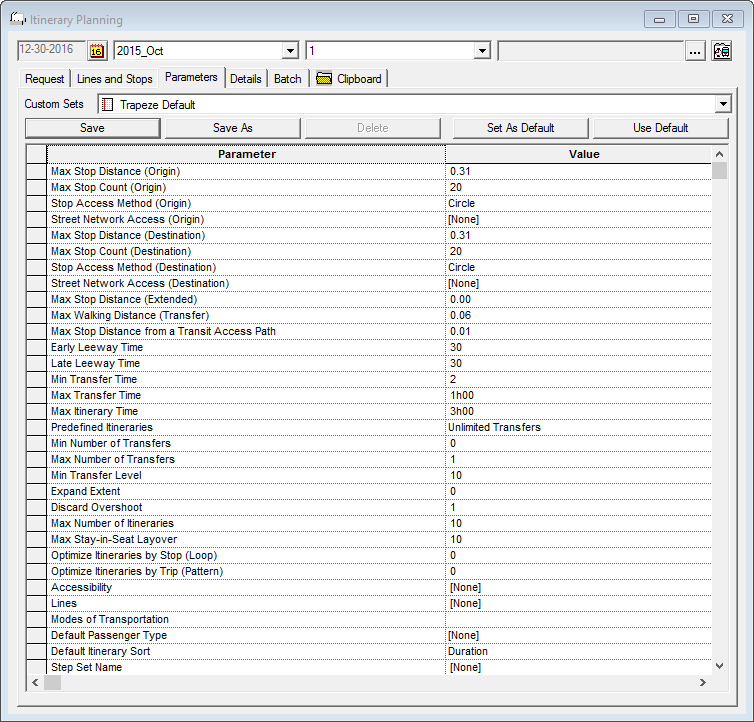
  1. Define the parameter sets:
    Create a default parameter set for requested pick-up times and another one for requested drop-off times. If your site does not use requested drop-off times, you only need to create one default parameter set.
    1. Click Task > Itinerary Planning.
    2. Click the Parameters tab.
    3. Create one or more parameter sets.
      If you have not previously defined a parameter set, the message Current or default Parameter Set not found. Using Trapeze Default set appears. When the default set is loaded, click Save As to save it.
    4. Click a parameter set in the Custom Sets list or use the current one.
      A list of parameters and their values appears.
      Example Parameter and Value list for a Custom Set called Trapeze Default.
    5. Modify the parameter set as needed.
      The Early Leeway Time and Late Leeway Time should be appropriate for the type of event (pick-up or drop-off) on which the request time is based.
    6. Click Save As.
    7. Specify a parameter set name and click OK.
    8. Optional: Click the Set As Default button to make the current set the default.
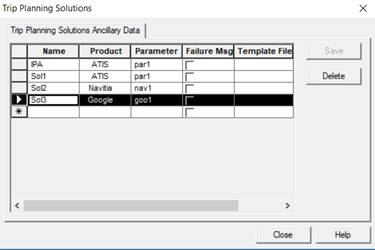
  2. Set up solutions ancillary data:
    1. Click File > Ancillary Data > General > Trip Planning Solutions.

    2. Define the following:
      Name
      A recognizable name for the solution.
      Product
      Select Google.
      Parameter
      Use the parameter set created in System Properties.
    3. Click Save.
    4. Click Close.
    5. Reopen Trip Planning Solutions ancillary data and verify that the new Trip Planning Solution is visible in the first row.
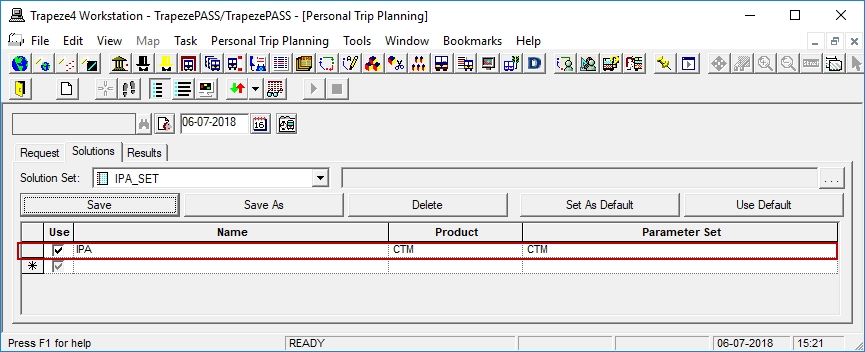
  3. Associate the created solution for Trapeze personal trip planning:
    1. Click Task > Personal Trip Planning.
    2. Click the Solutions tab.
    3. Modify the visible data using the Name column by selecting the Solution Name created in Trip Planning Solutions ancillary data.

    4. Click Save As.

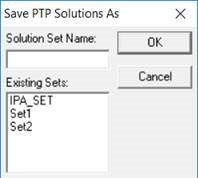
    5. Type a Solution Set Name for the modified version.
    6. Click OK.
  4. In the Trapeze4 Workstation, define the solution sets in IPA system properties:
    1. Click Tools > System Properties.
    2. On the Profile tab, click IPA > Solutions Set DO.
    3. Define the solution set to be used for drop-offs.
    4. Click IPA > Solutions Set PU.
    5. Define the solution set to be used for pick-ups.
  5. In the Trapeze6 Client Shell, define the default solution set:
    1. Navigate to Trapeze6 properties (also called context properties).
      Typically, this will be found under Tools > Properties, but the location may differ depending on system setup.
    2. Expand Properties > INFO > InfoPTP > Default Solution Set.
    3. Specify the name of the solution set to be used as the default.
      You do not need to enter any dependencies.
      Default solution sets are used by the Trapezez6 Service Shell for general case solutions. The solution sets that will be used as defaults for PASS trips are those defined in the Trapeze4 Workstation (in Tools > System Properties, on the Profile tab, under IPA > Default Solution Set, or in SolutionSetDO and SolutionSetPU, if individual drop-off and pick-up solution sets are defined). They are provided to the Service Shell by PASS.
    4. Click the Save button:

Results

PASS-IPA should be installed and ready-to-use.