Place text in quotation marks for exact match search results.
Extracting Trips for FTA Reports
You can extract ride check data to complete your FTA reports.
Do one of the following:
Click Ridership > Extract Riding Checks by Trip.
Click the Extract Riding Checks by Trip button:
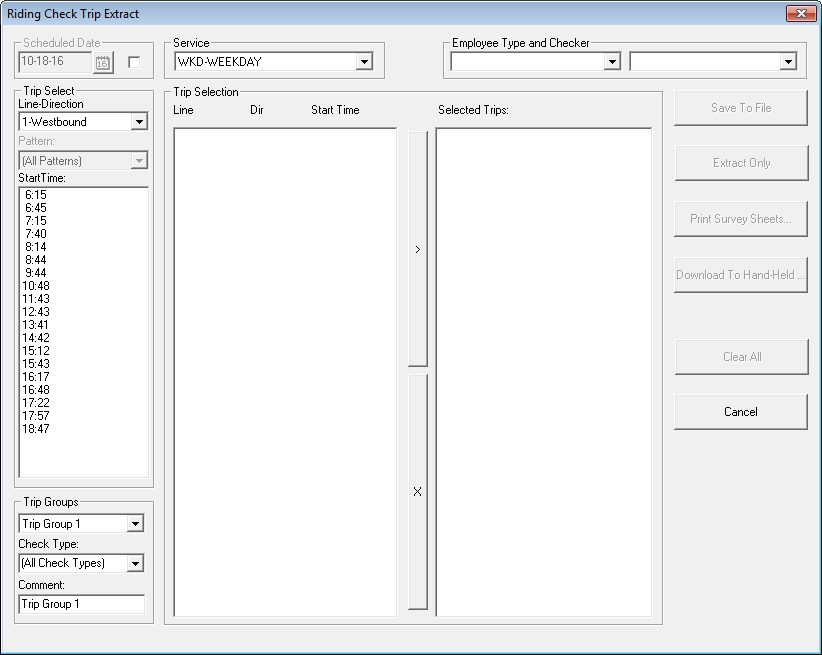
The Riding Check Trip Extract dialog box
appears.
Optional: In the Scheduled Date frame, select the check box.
If you select this option, the Line-Direction field appears
shaded.
The current date is automatically displayed; you can enter a different date, if
necessary.
In the Trip Select frame, select the appropriate line direction in
the Line-Direction drop-down list.
Optional: In the Pattern drop-down list, select the pattern of the line
you want.
The Pattern drop-down list is enabled if the Use
Pattern Name for Extract system property is set to
Yes. If set to No, the Pattern drop-down
list appears shaded.
From the times shown in the Start Time field, select the time of
the trips you want to extract.
The trips are then shown in the left column of the Trip
Selection pane.
Optional: In the Trip Groups frame, select a trip group.
Creating Trip Groups is used if you are creating extractions for hand-held computers.
Trip Groups make it easier to group ride checks into pieces of work for checkers.
In the Check Type drop-down list, select All
Check types or a specific Ride check type.
In the Comment field, enter a comment such as the date that
the trips will be checked. You are limited to 14 characters in the
Comment field.
In the Service drop-down list, select the appropriate
service.
Optional: In the Employee Type and Checker frame,
select the employee who is tasked to perform the ride check.
If you do not see the name of the appropriate checker, click Task > Employees in the Ridership screen.
In the Employees screen, click Employees > Add. Enter the information about the new checker and then click
Save on the toolbar.
If the Employees task is not available in the Task menu,
contact your Trapeze representative.
In the Trip Selection frame, select the trips in the left column
to be extracted by doing one of the following steps:
To select one trip, click the trip you want.
To select multiple adjacent trips:
Press SHIFT and click the first and last trip that you want
to include.
Select the first trip, and then drag the pointer to the last trip that you want to
include.
To select multiple non-adjacent trips, press CTRL and click
each trip that you want to include.
To move the selected trips to the right column, click the Add
(>) button.
Optional: To remove a trip from the right column, select the trip and then click the
Remove (X) button.
To perform the following steps, click the appropriate
button:
Save To File: To download the trip data to a hand-held device
remotely. (For Citrix users)
Extract Only: To extract the trip data only; you do not need
to print a survey sheet or download to a hand-held computer.
Print Survey Sheets: To extract the trip data and print a
survey sheet for collecting ride data manually.
Download To Hand-Held: To extract the trip data and download
the file to a hand-held device for collecting the ride data electronically.
A
message appears asking you if you want another extraction to be created.
This message appears when a trip has been extracted and not checked and then
another user extracts the same trip again.
Click Yes to check this trip for other purposes or click
No to check this trip for NTD purposes.
Note: Trips extractions can be created by random sampling or for reasons other than
creating FTA reports (that is, by methods other than random sampling). If you create
extractions both by random sampling and non-random methods, it is possible that an
extraction will be created more than once for the same trip. This message gives you the
option of replacing an unchecked random sample extraction that you created previously
(No) or creating a separate extraction that will not be flagged with the random sample
status (Yes). This message appears for each randomly sampled extraction. Read the trip
name on the message carefully each time so that you choose the right option for each
trip.
Perform one of the following steps as appropriate:
Click another button after the system has completed your first selection if you want
to perform another task, for example, if you clicked Extract
Only and then,want to download the data to a hand-held device, click
Save To File.
To remove the trips in the Selected Trips column or after you
have completed all your extraction options described in step 12, click Clear All.
Perform one of the following steps:
To extract trips for one date only, click Done.
To extract trips for more than one date, repeat the previous steps but change the
date in the Scheduled Date frame. In the Trip
Groups frame, change the group number and the comment to something that
reflects the new date.