Batch Scheduling Template Trips
Every time you have a new subscription or you want to stop a current subscription, you must update your templates.
Before you begin
About this task
When you batch schedule by matching to a template schedule and you select either the Synchronize Geocodes or Synchronize Schedule Times check box, the system reverts all geocodes and schedule times for subscription trips to the match schedule.
If you have templates that are not up to date, errors might occur. For example, a client who has moved to a different address wants to change the pick-up time of his subscription trip. You change the master record but forget to delete the old template and activate a new one. When you match a live schedule to the template schedule, the information on the old template overrides the information on the live schedule. The vehicle is sent to the old address at the wrong time and the client misses the trip. To prevent such errors, use other Match options instead.
Procedure
-
Select a schedule using the Select Schedule dialog box:
- Select the Schedule check box.
- Click the ellipsis button (…).
- In the Type list, click Template.
- In the Schedule list, select a day of the week.
- Click OK.
-
Make sure the Act, Sch.,
Unsch check boxes and the Both option are
selected to show the activated template trips.

-
Click Display.
All template schedules for the selected week day are shown.
-
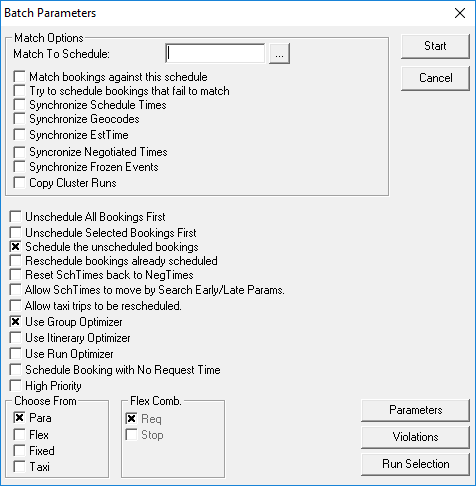
Click .
The Batch Parameters dialog box appears.
-
In the Choose From frame, select the Para
check box.
If you schedule taxi runs, also select the Taxi check box.
-
Select the scheduling options you want.
To achieve a fast and simple batch schedule, it is recommended that you choose only the Schedule the unscheduled bookings and the Allow Use of Group Optimizer check boxes.
-
Click Start.
The batch scheduling process begins. The Batch Monitor dialog box appears showing the batch scheduling status.
- When the batch is completed, click Close.
-
In Trip Administration, click Display.
The scheduled and unscheduled activated trips appear.
- To see the remaining unscheduled trips, click the Unsch check box only and click Display.
- Select all the trips on the grid and schedule them using the Schedule Booking Wizard.