Blocking Trips Manually
The manual approach links or hooks one trip at a time in a consecutive manner. The trips follow one another in order according to the parameters that have been set.
- Do not have many policy or union agreements such as layover requirements that relate to your vehicle assignments.
- Must recreate blocking data from a previous sign-up period.
- In the Unblocked grid, select the first trip.
-
Click .
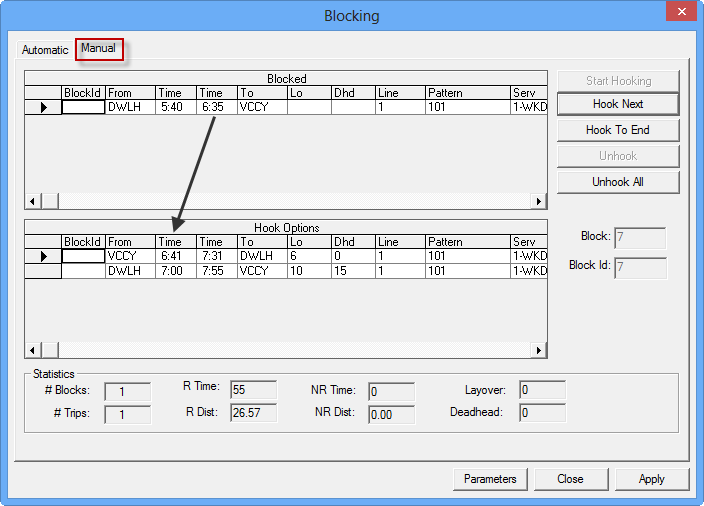
The Blocking dialog box appears with the Automatic tab open by default.
- Select the Manual tab.
-
Click Start Hooking.
The selected trip from the Unblocked grid appears in the Blocked frame on the Manual tab. Trips that can hook to the selected trip (based on your Blocking parameters) appear in the Hook Options frame.
The first consecutive trip is always shown as the next available trip.
-
Select the trip from the Hooks Options frame
that you wish to hook to your block and click Hook Next.
In the Statistics frame, the values in the Layover and Deadhead fields are updated as you move through the trips in the Hook Options grid. These fields show the layover and deadhead times between trips.The selected trip appears in the Blocked frame. Trips that it can possibly hook to appear in the Hook Options frame. In the example shown in the following graphic, it appears that the 6:35 To time can hook with the 6:41 From time at Node VCCY.
-
Do one of the following steps:
- Repeat step 5 until you have completed building your block.
- Click Hook To End for the system to automatically hook the trips that can work together.
- Optional:
Perform any of the following tasks as applicable:
- If you are not satisfied with your last hook and wish to change it, click Unhook. The last trip you hooked reappears in the Hook Options frame.
- To unhook all the trips, click Unhook All. All the trips disappear from the Manual tab.
- To speed up the process, review the trips in the Hook Options grid. If you are confident that they hook properly, click Hook To End. This command hooks the rest of the consecutive trips available based on your parameters.
- If you are starting a new block, type the number that you want to assign the new block in the Block and Block Id fields.
-
Once the block is complete, click Apply.
The grid in the Unblocked pane is no longer displayed.
- Review the statistics of the blocks you created in the Statistics frame.
- Optional: Click Parameters and change the blocking parameters as allowed by the policies and union agreements of your transit site if necessary.
- Optional: Unhook the trips that are not satisfactory and repeat the procedure until you have the blocks that satisfy your requirements.
-
Click Close.
The Block and Block Id fields are set to the next available block number. For example, if the number of the last block in the Blocked grid is "6", the number in these fields is "7", as shown in the sample graphic on step 5. Since you do not have to change the values in these fields when editing or adding a block, they are not activated.