Period Pass Purchases Using Multiple Payment Methods
Period passes can be purchased with an amount from the client's purse and an amount paid on account, or using cash, credit card, debit card, check, or wire transfer.
Before you begin
About this task
Procedure
- Search for and select the Client purchasing the period pass.
- Click the Period Passes tab.
-
Click Purchase Pass.
The Purchase Period Pass dialog box appears.
-
In the Payment Method list, select the method by which the
payment is made.
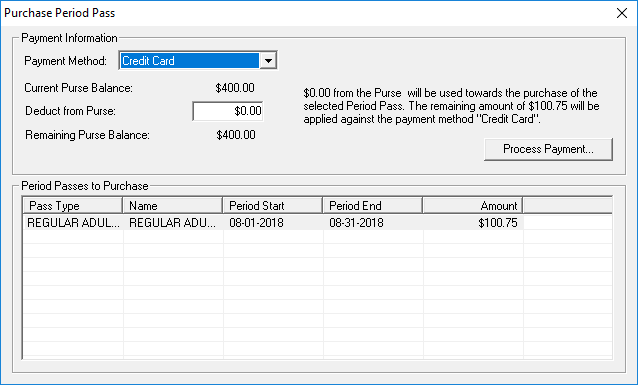
-
In the Deduct from Purse ($) field, type the amount to deduct
from the client's account.
The remaining amount will be paid using the method selected in the Payment Method list.
- In the Period Passes to Purchase grid, click the pass that the client is purchasing.
-
Click Process Payment.
The Terms and Conditions dialog box appears.
- Optional: Select another language in the Default Language list based on
the client's preference.
The manner in which the client is informed of the terms and conditions of the transaction depends on your transit agency's policies. For example, you can choose to read the terms and conditions to the client or provide him or her a copy to read.
- If the client agrees to the terms and conditions, select the I have read and agree to the above terms and conditions check box.
-
Click OK.
The Confirmation dialog box appears.
-
Provide the information associated with the payment type:
If the client is using Complete these fields Cash, their purse, or on account - Status
The status of transaction.
Status options are defined in ancillary data.
- Reason
The reason for the transaction.
Reasons are defined in ancillary data.
- Comments
- Any comments about the transaction.
Credit card
- Card type
- The card type in the list.
- Status
- The status of transaction.
- Reason
- The reason for the transaction.
- Please enter the Confirmation Number
- The confirmation number provided by the issuer after the transaction has been processed. If a mask is used (for example, #####), typing the confirmation number will overwrite the mask as the number is typed.
- Comments
- Any comments about the transaction.
Debit card - Card type
- The card type in the list.
- Status
- The status of transaction.
- Reason
- The reason for the transaction.
- Please enter the Confirmation Number
- The confirmation number provided by the issuer after the transaction has been processed. If a mask is used (for example, #####), typing the confirmation number will overwrite the mask as the number is typed.
- Comments
- Any comments about the transaction.
Check - Card type
- The card type in the list.
- Status
- The status of transaction.
- Reason
- The reason for the transaction.
- Cheque #
- The check number.
- Cheque Date
- The date the check was issued.
- Comments
- Any comments about the transaction.
Wire transfer - Status
- The status of transaction.
- Reason
- The reason for the transaction.
- Wire transfer #
- The wire transfer number.
- Transfer Date
- The date the transfer was done.
- Comments
- Any comments about the transaction.
-
Click OK.
The period pass is listed in the Purchased Period Passes grid in the upper half of the window.
- Close EZ-Wallet.