Booking Group Trips
After saving a group trip, each client pick-up and drop-off is treated as a separate trip and is designated a unique booking ID.
Before you begin
About this task
Procedure
-
Click the Add New button:

-
Select the Group check box.
The Group Booking tab is enabled.
-
Do one of the following:
- In the Client field, type the complete or partial name of the group and then double-click the appropriate group.
- Type an equal sign (=) to generate a complete list of defined groups and then double-click the appropriate group.
Note: This functionality is only available if you have Trapeze4 on your main computer screen. If the application is used on a secondary computer screen, the first option in the list is selected automatically or no options are suggested.The Group field on the Detail tab is filled in with the name of the group. The Group Booking tab lists all clients who belong to the group. If a date range is specified for the group in the Group Booking ancillary data, a message appears indicating the dates on which group bookings are allowed. -
Select either Casual or
Subscription.
For Casual Bookings, in the Date field, specify a date that falls on or within the dates specified.
-
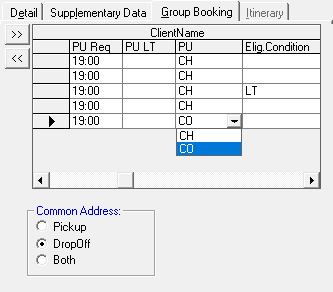
On the Group Booking tab, choose one of the following options in
the Common Address frame:
-
- Pickup
- When group members start a trip at a single point of origin but are dropped off
at different locations.
On the Origin tab, enter the address information. The Destination tab is not enabled. Instead, the system uses the default client address for each client drop-off. If no default is assigned, the first client address defined for the client in the client address table is used. For example, Client Alternate.
-
- DropOff
- When group members are dropped off at a single point of destination but are
picked up at different locations.
The Origin tab is not enabled. Instead, the system uses the default client address for each client pick-up. You must then enter the address information for the common drop-off point on the Destination tab.
-
- Both
- When group members are picked up from a common origin (for example, Snowart
Seniors' Residence) and dropped off at a common destination (for example, Oakleaf
Community Center).
Fill in the address information on both the Origin and Destination tabs. If there is a From and/or To common location specified for the group in the Location fields of the Group Booking ancillary data, the locations are shown on the Origin and/or Destination tabs by default. Overwrite the addresses where necessary.
-
-
On the Group Booking tab, do one of the following:
- Accept the pick-up or drop-off client address as the default for each client.
- Choose another client address in the list (client PU for
group drop-offs or client DO for group pick-ups).
-
Do one of the following:
- Type the requested (Req) times for pick-up or drop-off at
the common address.
If a From or To trip time is specified for the group in the Group Booking ancillary data, the Req fields on the Origin and Destination tabs are filled in.
When you have a common pick-up and common drop-off you can only type one requested time (either the Origin or the Destination). If you type a requested drop-off time but want the system to calculate a pick-up time, use the Req check box on the Destination tab.
- Type individual requested pick-up or drop-off times for each client under the
PU Req/DO Req field column of the Group
Booking tab.
Do not type individual client times if Both was selected as clients will be picked up at the origin and dropped off at the destination the same time.
- Type the requested (Req) times for pick-up or drop-off at
the common address.
-
Type all of the appropriate trip details for this trip including, but not limited to,
purpose, provider, funding source(s), ParaService, mobility aids, and any general
comments.
Individual client defaults for fare type and funding source are used for group trips unless defaults are set for the group. Group defaults override client defaults.
-
Confirm that the information in the Leg Detail frame is correct
for each client:
- Optional: To remove a client from the group, click the << (remove) button.
- Optional: To add a client to the group, click the >> (add) button and use the Find Clients dialog box to Find and Select a client.
- On the Group Booking tab, select the first client.
- Click the Detail tab.
- In the Leg Detail frame, adjust the information for the client where necessary.
- Select the next client and repeat the procedure.
- Click the Save button:
