Saving Scenarios
The Save button is always enabled. When you cut or uncut a run or make a change to a parameter without saving, you are prompted to save.
After you have defined a set of parameters and achieved a runcut you want to keep, you can save the scenario.
When you make changes to a previously saved scenario, you need to save the modified scenario as a new scenario (give it a different name).
You can save as many scenarios as you want for comparison later.
-
On the Runs tab, click the Save button:
 The New Scenario dialog appears.
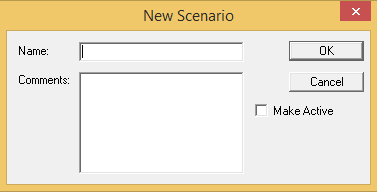
- In the Name field, type a name for the scenario. Give it a unique and meaningful name so that you can remember it and use or build on it later.
-
In the Comments field, type a comment to
document what you have done.
If you loaded a parameter set, the name of the file is added as a comment and is automatically shown in the Comments field, as shown in the following graphic.
- (If applicable) To save the scenario as an active scenario, select the Make Active check box.
-
Click OK.
Alternatively, to select a new context and you are already working with scenario, press F3. The system displays message asking if you want to save the scenario on which you have been working until that point. Click Yes.When you open a scenario, the system automatically copies the scenario into your folder. When you close the scenario without saving it, the system saves it for you. In this case, if you made changes on the scenario, they are only applied to the copy saved in your folder.