Loading Waits and Travels
After the waits have been defined, load them to the Travels grid.
-
In the Waits and Travels dialog, click
Load.
The Load dialog appears.
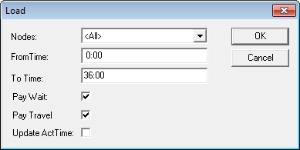
- From the Nodes list, select the set of nodes you want to load or select All to include all records. <All> is selected by default.
- In the From Time and To Time fields, type the applicable time interval when the wait and travel applies. These fields are set to 0:00 and 36:00, respectively, by default.
- To indicate that the transit site pays for wait time, select the Pay Wait check box. If selected, the check box in the Pay Wait column of the Travels screen is selected.
- To indicate that the transit site pays for travel time, select the Pay Travel check box. If selected, the Paid Time column of the Travel screen shows number of hours that are paid.
- To update the actual times, select the Update Act Time check box. The system updates the Actual times of the wait and travel to match the Paid time. If you do not select this check box, the Actual Times column shows the value of zero (0).
-
Click OK.
A message box appears informing you of the number of travels that has been created.
- Click OK.
The Wait and Travel records appear in the grid with time ranges representing arrival times at the “off” stop if the travel is from a garage to a node (relief node) or representing departure times from the “on” stop if the travel is from a node to a garage. The property that enables this is set in FX. Refer to the section on Runcutting properties in the FX User Guide.