Adding Nodes and Stops to Lines
You can add nodes and stops to lines using the Edit dialog box.
- Establish proper naming conventions for all nodes and stops used in your system for uniformity and consistency. For example, use the first two letters of the street names at the location with all letters entered in upper case, for example, BUGR for Buchanan-Grand River.
-
Check if the node or stop you want to add already exists in your database to avoid duplication.
- Ensure that you have selected the appropriate line when you set your context in the Set Mode dialog box.
- Ensure
that you have selected the appropriate direction, for example,
Northbound, to which you want to add the node or
stop.Note: Create nodes and stops for one direction. Then, use the Copy feature to create the nodes and stops for the opposite direction as discussed in Copying Nodes and Stops.
-
Do one of the following steps:
- Click .
- Click the Edit button:
 .
.
The Edit dialog box appears with the data of the node selected on the Nodes grid shown. The Node and Stop check boxes are selected by default. -
On the Edit tab, click Add New.
The system removes the previous data and automatically generates the next number in the ID sequence as shown in the Id field.
-
To add a node and/or a stop, perform one of the following steps:
-
To add a node located at a stop (node/stop), leave both Node and Stop check boxes selected.
- To add a node that is not located at a stop, clear the Stop check box.
- To add a stop, clear the Node check box.
Type the full name or location of the node/stop in the Name fields in the Node and Stop frames.
-
-
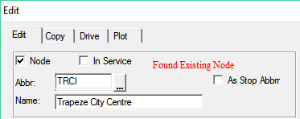
If adding a node/stop, type an appropriate abbreviation for the node/stop in the
Abbr (Abbreviation) fields in the
Node and Stop frames.
If a node or stop exists that has the same abbreviation in another agency, a warning appears. See the message in red in the following graphic. (You can choose to create a new node or stop with another name or use the existing record.)
 Type the full name or location of the node/stop in the Name fields in the Node and Stop frames.Note: A maximum number of 60 characters is allowed in the Name field.
 -
Perform the following steps as necessary:
-
To apply the Stop abbreviation as the Node abbreviation, select the As Stop Abbr check box.
If the Stop Abbr is more than 8 characters, the system only copies the first 8 characters as the Node Abbr.
- To apply labels, in the Label field, type the labels with which you want to identify the node. For example, if the node is also a relief point, type the letter R in the Label field.
-
To apply the label to the appropriate division and service, click Edit Labels.
- (If using FLEX) If the route to which you are assigning the node or stop is a Flex route, type the number of minutes that you would like to assign an operator as slack time in the Slack field.
- To create another node and/or stop, leave the Repeat check box selected, The data you applied is cleared and the next number in the ID sequence appears in the Id field. This means that you can type the data for the next node and/or stop.
- If you cleared the Repeat check box, the data you applied including the ID of the new node and/or stop remains on the tab.
-
-
Click Apply.
The node and/or stop is added to the appropriate Nodes grid. If you created a stop, you may not see it on the grid unless you selected the check box on the upper-right corner of the grid.
- Click Close.