Creating Casual Bookings
Casual bookings are created for trips that typically occur once.
Before you begin
Procedure
-
Click the Add New button:

-
Define a date for the booking:
- In the Date field, specify the date for the booking using
one of the following methods:
- Type the date (you can type now or today to use the current date).
- Use + to add a specific number of days to the current date (for example, +3 specifies the date three days from today).
- Use the up and down arrows to browse for a date.
- Click the Calendar button:

In the calendar, click the date or dates on which you want to book the casual trips, and then click Done. The system copies your choice to the date field.
If the From date has already passed, a The booking date has passed already. Do you wish to proceed? message appears. Click Yes to continue, or click No to correct the date. - In the Date field, specify the date for the booking using
one of the following methods:
-
Select Casual.
Casual is selected by default.
-
In the Booking Subtype list, click the booking subtype for the
trip.

Typically, you would specify the demand subtype defined on your system (for example, DEM or STD).Booking subtypes are defined in booking subtypes ancillary data.
The default setting is set by the system administrator in , on the Profile tab, in . - In the Client field, choose a client.
- (If applicable) If a message warns you that the client is not eligible for the specified date, click No to clear the client’s name from the Client field, or click Yes to type the client name in the Client field.
-
Type and geocode the Origin and
Destination addresses.
If you chose default pick-up or drop-off addresses in Clients, they automatically appear in the address fields. If a client’s pick-up or drop-off location is one that has been marked as Needs Special Attention in the Detail tab of Common Locations (), an information window appears with the comments entered for that location. Be sure to read those comments, and then click OK.To use a bus stop, the InService check box must be selected for the stop in . If it is cleared, the bus stop is not valid for trip bookings. Bus stop names are shown in the address name field.
- Optional:
On the Origin or Destination tab of the
geocoded address, click the Find Closest Wizard button:

The Find Closest Wizard dialog box appears with the address filled out. - Optional:
Click the camera icon beside a common Origin or Destination location to view a picture
of it.
To close the picture, click it or press Esc on the keyboard.
-
If the Match Location Times dialog box appears, do one of the following:
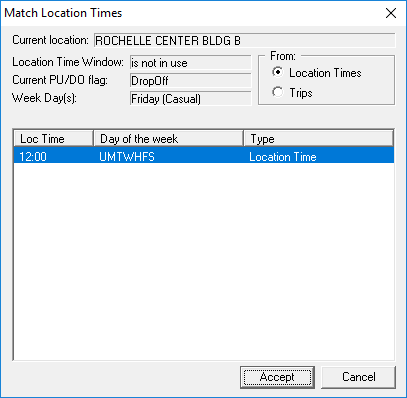
- To schedule the trip at a regular pick-up or drop-off time for the location, or at
a regular opening or closing time for a program at the location, select the
Location Times or Open Times option.
Click the time for which you want to schedule the trip, and then click Accept.
Regular pick-up and drop-off times are entered in Location records. Program opening and closing times are entered in Location Program records.
- To schedule the trip at the same time as a trip that was previously booked, select
the Trips option. To view times for unscheduled trips, select the Show Also Unscheduled Trips with Unique Time Pairs check box.
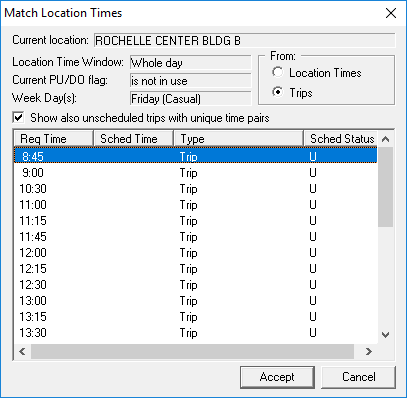
Click the time for which you want to schedule the trip and click Accept.
-
If you do not want to request a trip time that is shown in the Match Location Times dialog box, click Cancel.
- To schedule the trip at a regular pick-up or drop-off time for the location, or at
a regular opening or closing time for a program at the location, select the
Location Times or Open Times option.
-
If you did not select a pick-up or drop-off time in the Match Location
Times dialog box, type the requested pick-up or drop-off time in the
Origin or Destination tab.
A client can request a time to be picked up or dropped off, but not both.

Use the ET and LT fields only if your client cannot be picked up earlier or later than a certain time. Early and late times restrict the scheduling solutions.
-
- Req
- The time the client requests a pick-up or drop-off.
If you enter a Req time in Destination frame, then in the Destination frame, select the Req check box. The pick-up time is then calculated.
Depending on system properties, this check box may be selected automatically.
-
- ET
- The earliest time the client agrees to be picked up or dropped off.
-
- LT
- The latest time the client agrees to be picked up or dropped off.
-
-
On the Detail tabs, fill in additional information as
needed.
Fields may already be populated by information from the client record or by default selections determined by property settings.
-
On the Supplementary tab, fill in additional information as
needed.
Fields may already be populated by information from the client record or by default selections determined by property settings.
- Optional: Book a return trip.
- Optional: Create a linked return trip.
- Do one of the following:
To Do this Save the booking for batch scheduling later Click the Save button: 
Schedule the booking immediately Click the Schedule button: 