Adding Supplementary Data Fields
Supplementary data allows system administrators to create new fields so that users can provide additional information when creating records.
Procedure
-
Click .
The Screen with Supplementary Fields dialog box appears.
The Admin button is only accessible to system administrators.
- Optional: Select a screen for which you want to create supplementary fields.
-
Do one of the following:
- Click the Add button.
- Double-click the selected screen name.
The Supplementary Data Manager dialog box appears. - In the Screen Name list, click the screen for which to add supplementary data.
- In the left frame, select a field to add to the supplementary data list.
-
Click the Add button.
The Supplementary Field Defn. (Definition) dialog box appears.
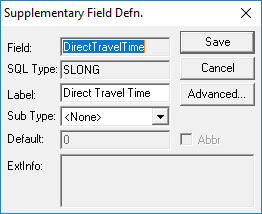
The Field and SQL Type (field data type) fields are unavailable.
- Optional:
To change the value that is in the Label field, overwrite it
with the name that you want. The new name appears as the column heading of the associated
data when displayed on the selected screen.
When you work on the supplementary field again, the new name appears by default. If there is no label, the field automatically takes the value in the Field text box (that is, the values in the Field and Label fields are the same).
- Optional:
In the Sub Type list, click the appropriate subtype for the
field.
For example, for time-related fields such as Report Time, select Time or Time Format.If you select Combobox, you can type text in the ExtInfo (Extended Information) field.If you select IBAN (International Bank Account Number), the field formats IBAN numbers to display correctly.Your selection appears in the Ext Type column of the Supplementary Data Manager dialog box.
- Optional:
Perform one of the following steps:
- In the Default field, type the format of the subtype you
selected.
For example, if you chose the Time subtype for Report Time, type 0:00.
- Leave the Default field blank.
The system assigns a value where applicable (for example, for Time, it assigns 12:00a if you are using the APX time format).
- In the Default field, type the format of the subtype you
selected.
- Optional:
Click the Advanced button and select the
Write check box.
System users will be able to type information in the supplementary data field on the defined screen.
- Optional:
Select the Security Required check box.
Users can only edit the defined supplementary data field if the Trapeze6 security permission is granted.
If the security permission is set to Override, the user can type in the field and will be prompted for a supervisor with the permission granted to type their user name and password. This allows the user the ability to edit all supervisor-locked supplementary data fields and is reset when the user looks at a new record. For example, a new client or new vehicle record.
- Optional: If this supplementary data field's information should appear in PASS-Web, select the Pass Web check box.
- Optional:
If this supplementary data field's information should appear in DriverMate, select the
MDT check box.
In DriverMate, supplemental data is seen on the Trip Details screen show as PASS field name; Supplementary Data value. Data is shown in the order it is received from PASS.
- Click Save.
- Optional:
Change the display order of the fields in the Supplementary Data
Manager dialog box by clicking the arrow buttons below the
Remove button.
If you click the first set of data in the list, the up arrow changes into a square box.
If you click the last set of data in the list, the down arrow changes into a square box.
- Click Close.
- Optional:
Remove supplementary data fields as needed:
-
Review the defined supplementary data:
- In , on the Supplementary Data tab.
- In , on the Misc (Miscellaneous) tab.
- In , on the Detail tab.
- In , on the Detail tab.
- In , on the Detail tab.
- In , on the Supplementary Data tab.
- In , on the Supplementary Data tab.