You can enter multiple contact people for a funding source using Contact Category
ancillary data.
About this task
Multiple contact methods can be specified for each contact person and can indicate
when each contact method can be used.
Procedure
-
Click .
-
Select the funding source which you want to enter multiple contacts and click
Edit.
-
Click the Contact Info button.
The Contact Category dialog box appears. The
Contact Type and Facility are
filled.
-
Add a contact person for the funding source:
-
Type a Name for the contact person
This is an identifier and may or may not reflect the person's actual name.
-
Type the First Name for the contact person.
-
Type the Last Name for the contact person.
-
Click the JuristPoly (jurisdiction polygon) in which the
contact is located.
-
Click the contact Category to which to assign the
contact.
This could be Manager
-
Type the contact person’s Fax number.
-
Type the contact person’s Phone number.
-
Type the contact person's Email Address.
-
Click Add.
-
In the grid, select the contact person, and then click
Edit.
-
Click Contact Info.
-
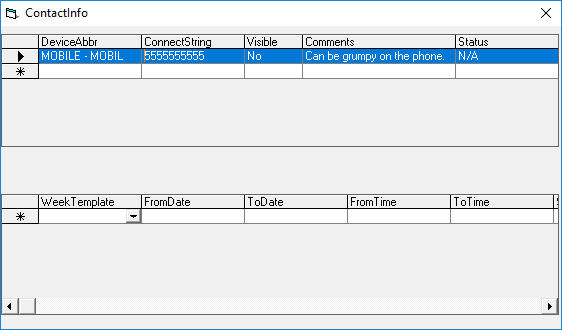
In the Contact Info dialog box, complete the following
fields:
- Device Abbr
- In the list, click the device type.
For example, cell phone.
- Connect String
- Type the contact information.
For example, phone number or e-mail
address.
- Visible
- To make the contact information visible on other PASS screens, click
Yes in the list.
If you choose
No, the information is masked by asterisks on other PASS
screens.
- Comments
- Type any comments about the contact.
-
Click in the row marked with an asterisk.
-
To set days of the week or times when the contact method can be used, do the
following:
-
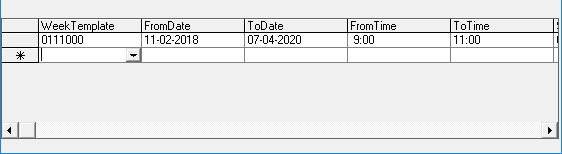
In the top grid, click the contact method.

-
In the lower grid, in the row marked with an asterisk (*), in the
WeekTemplate column, select the days of the week the contact
method can be used.
The WeekTemplate field is populated with the selected options (as 1s or
0s).
-
Type the first date (FromDate) when the contact method can
be used.
-
Type the last date (ToDate) when the contact method can be
used.
-
Type the earliest time (FromTime) the contact method can be
used on the defined dates.
-
Type the latest time (ToTime) the contact method can be used
on the defined dates.
-
Type any Comments.
-
To retain the data, click in the row below or the row above the selected row.

-
Close out of the ContactInfo dialog box.
-
Click Save.
-
To verify the information has been saved, in the Contact
Category dialog box, click the row for the contact and click
Contact Info.
-
Select the row for the DeviceAbbr to be checked.
The defined dates and times are visible in the lower grid.
-
Close out of the ContactInfo dialog box.
-
Click Close.