Shifting Reliefs
The Shift Relief function is used to show you the results and costs of shifting the time at a relief point on a run. It is used in manual runcutting only.
Shifting reliefs may have a direct impact on the overall cost of the whole division. This cost is usually reflected by the Pay and Efficiency values.
- In the Cut Pieces grid, select the run for which you want to shift the relief point.
-
Click .
The Shift Relief dialog appears. The data of the selected run appears in the left frames of the dialog. A list of the relief nodes appears in the Reliefs frame.
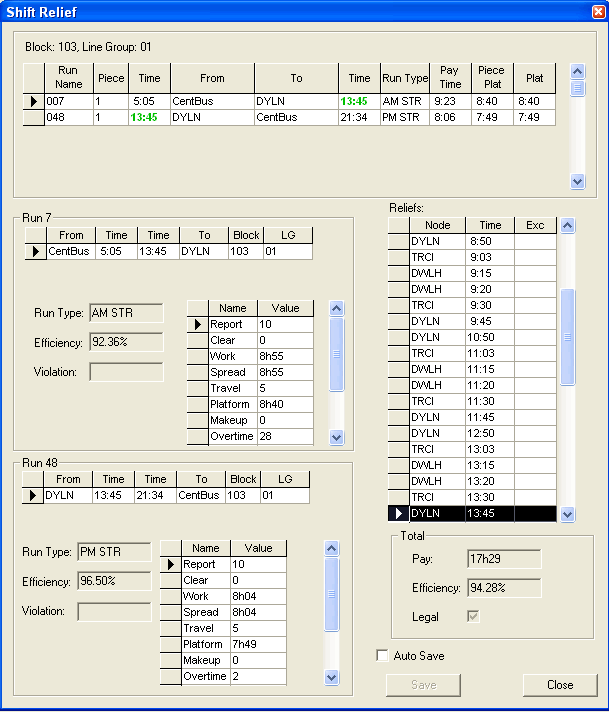
If your transit property uses floating or moving reliefs, the reliefs are displayed with an ‘at sign’ (@) that allows you to float/move the relief based on the parameter you have set in the Parameters table: Miscellaneous\Miscellaneous\Miscellaneous Runs\Moving relief increment.
- Optional:
To save your changes automatically, select the Auto Save check
box.
Note: Do not use this option if you want to keep track of your changes.
-
In the Reliefs frame, click the highlighted node (the node in
the selected run) and move it to the node to which you want to shift the relief.
As you move your cursor, the data on the times, pay, efficiency and values of the applicable contract rules change automatically in the dialog. Review each set of data until you find the most acceptable solution.
- If you did not select the Auto Save check box, click Save.
- Click Close.