Editing Flag Stops in Run Itineraries
You can edit or add information related to flag stops, such as passenger types, number of spaces taken, and fare collected.
Before you begin
Procedure
- Select the flag stop event.
-
Right-click and click Edit Event Activity.
The Event Activity dialog box appears.
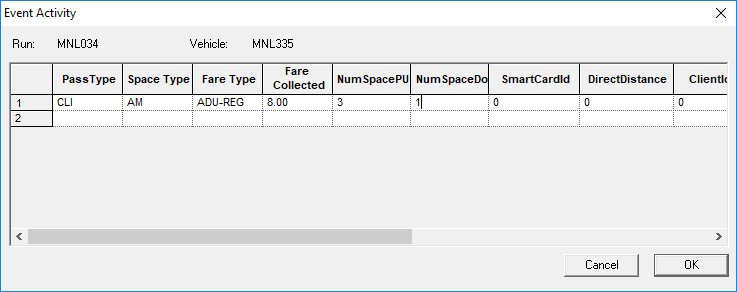
-
In row 1, click a passenger type in the PassType field list. For
example, Client.
Note: This functionality is only available if you have Trapeze4 on your main computer screen. If the application is used on a secondary computer screen, the first option in the list is selected automatically or no options are suggested.
-
Click a Space Type in the list.
This is the space type used by the client. Space types are defined in ancillary data by a system administrator.
-
Click a Fare Type in the list.
This is the fare type charged to the client.
- Type the Fare Collected.
- Optional:
In the NumSpacePU field, type the number of spaces on the
vehicle that were occupied by the client boarding the vehicle at the flag stop.
The fare collected is the total amount received. NumSpacePU is 2, and the Fare Collected is $6.00, then $3.00 was applied to each space.
- Optional: In the NumSpaceDO field, type the number of spaces on the vehicle that were vacated by the client disembarking at the flag stop.
- Optional:
Complete any other fields:
- SmartCardId
- Smart card number associated with the client. This information can be found in , on the Detail tab.
- DirectDistance
- Distance from the previous event to the flag stop event.
- ClientId
- Identification number of the client. This information can be found in , on the General tab.
- Funding Source ID
- Identification number of the funding source used by the client. This information can be found in , on the Funding Source tab.
- Purpose Code
- Code associated with the booking purpose type for this client event. Booking purpose types are defined in ancillary data (in ).
- Signature ID
- File path for the client signature when required by a funding source.
-
Click OK.
A confirmation message appears asking if you want to save.
-
Click Yes.
The Event Activity dialog box closes and the new information is added to the flag stop event.