Understanding the Shift Relief Dialog Box
The Shift Relief dialog box allows you to view details of a selected run and to see how the cost of the run is affected when you shift reliefs.
The Shift Relief dialog box is divided into four major frames. The two left frames are identical and display information on the selected run. The data of the selected run appears in the lower left frame. You can re-size the dialog box to display the pieces being runcut.
If the relief point is on the street, the data on the run prior to the selected run appears in the upper left frame. Each frame shows the first/last relief point of the selected run and their From and To times and the block and line group to which the run belongs; the run type and pay/plat of the run; a list of the applicable contract rules and their values; and Test Type and Rule Broken fields.
The Reliefs frame displays the relief points of the run. If the relief is on the street, the relief point between the two runs is highlighted. The relief nodes above this point belong to the first run while those below belong to the second run. If the relief is at a garage, it is highlighted and is first on the list. Shift the reliefs in this frame by moving the cursor or use the Up and Down arrow keys on your keyboard to move up and down the list of relief points in the frame. The relief point is highlighted as you select it.
The Total frame shows the total Pay and Pay/Plat (Platform) for the run. The Legal check box is a Read Only feature. Once the run or either one of the pieces in a two-piece run becomes illegal, the check box is cleared.
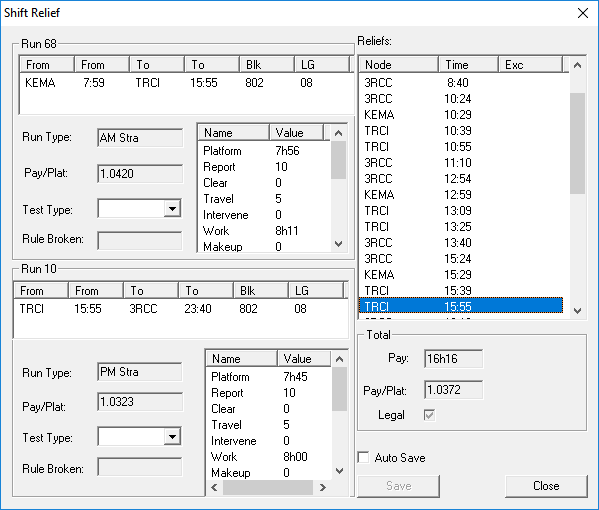
Run 68 is in the top frame while Run 10 is in the bottom frame.
The reliefs above the highlighted relief points are part of Run 68 while those below belong to Run 10.
Run 68 has a relief point at 15:55 at node TRCI from which Run 10 begins.