Adding Deadheads
You can add deadheads on the Deadheads tab of the Blocking screen.
In a multi-agency environment, you can create garage deadheads using a garage of one agency and a node of another agency, if necessary.
-
On the Deadheads tab, click the Edit button:
 .
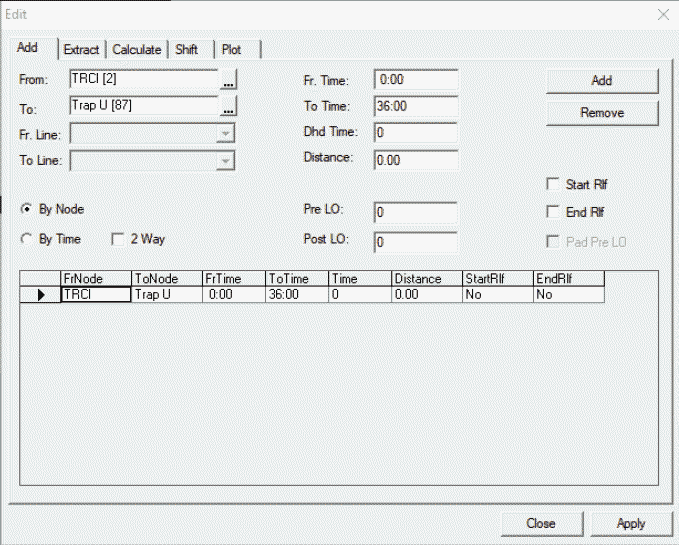
The Edit dialog box appears. The Add tab is open by default.
.
The Edit dialog box appears. The Add tab is open by default. - In the From list, select the node or garage you want.
- In the To list, select the node or garage you want.
- Optional: If the deadhead you are adding is line dependent, type the applicable lines in the Fr. Line and To Line fields.
-
To add multiple time intervals for the deadhead pair, click the By
Node option.
The To time of the last time interval you created is automatically entered in the Fr.Time field. This avoids creating overlapping time intervals.
- Optional:
To use only one time interval for the deadhead pair, click the By
Time option.
Use this option if you use one time interval for the whole workday such as from 0:00 to 26:00.
- In the Fr. Time and To Time fields, type the applicable start and end times of the interval you want.
- Optional: In the Dhd Time field, type the applicable deadhead time.
- Optional:
In the Distance field, type the applicable distance of the
deadhead.
You can use the Calculate tab to calculate the time and distance of the selected pair.
- Optional:
Perform any of the following steps:
- If the time and distance between the From and To locations are the same in both directions, select the 2 Way check box.
- If your transit site uses Pre and Post Layovers, select the Pad Pre LO check box, and then type the applicable values in the Pre LO and Post LO fields. (These options are only activated if the Use Pre and Post Layovers user-defined property is set to Yes. The Pre LO, Post LO, and Pad Pre LO columns are also displayed in the grid.
-
Select the Start Rlf or End Rlf check box depending on where the deadhead will be applied.
These options are only shown if the Use Deadhead Reliefs user-defined property is set to Yes. The StartRlf and EndRlf columns are also shown in the grid.
-
Click Add.
The deadhead is added to the grid in the lower section of the dialog box.
- Optional: To create more deadheads if necessary, repeat steps 2 to 11.
-
Click Apply.
The Select Service Groups dialog box appears.
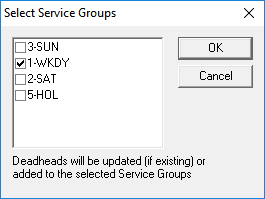 Note: This dialog box only appears if you are using service group dependent deadheads.
 - Optional: To assign the deadheads to the appropriate service groups, select the service groups you want and click OK.
-
Click Close.
If you click Close without applying your information, a message prompts you to click Yes to save the data. Click No to proceed with closing the dialog box, or click Cancel to keep it open.