Eligibility tests are created and managed in Eligibility Tests ancillary
data.
About this task
Trip bookings can be checked for allowable dates and times, trip quotas, journey
information, leg information, and fixed route availability. Use caution when deleting
eligibility tests because they cannot be recovered after they have been removed.
Procedure
-
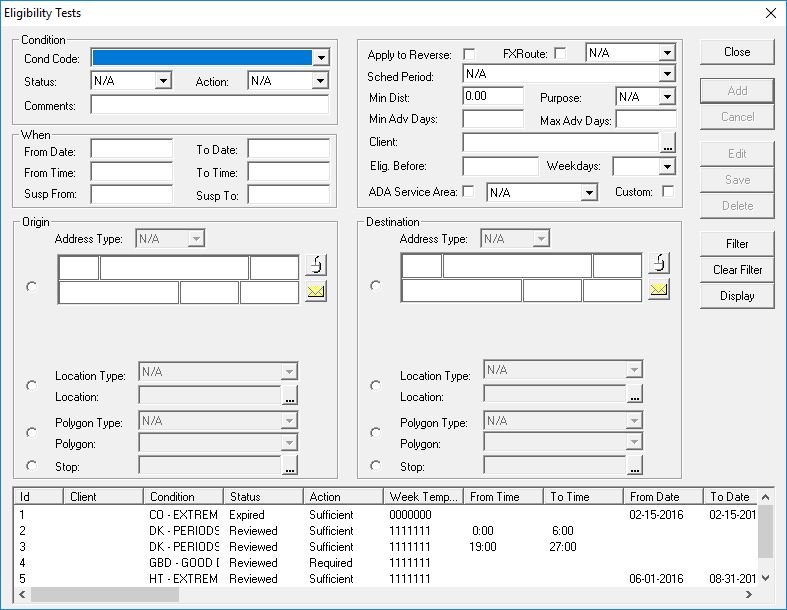
Click .
The Eligibility Tests dialog box appears.
-
In the Condition frame, provide the following information as required:
-
Click a condition code (Cond Code) in the list.
Condition codes are defined in Eligibility Conditions ancillary data (found in ).
-
Click an eligibility Status code in the list.
Ensure the selected status is valid or else the test will not be evaluated by the
testing service. For this reason, eligibility status codes must be created before
creating eligibility tests. See Eligibility Status Codes for information about setting
up these codes. Eligibility Status Codes are defined in Eligibility Status Codes
ancillary data (found in ).
-
Click an Action:
- Required
- All required tests associated with an eligibility condition must pass for a
trip to be allowed.
- Sufficient
- If the trip passes at least one tests for an eligibility condition, allow the
trip to be booked.
- Denied
- If the trip matches one or more deny tests defined for an eligibility
condition, do not allow the trip to be booked.
-
Type any Comments to be shown in the results screen.
These comments will be shown to the reservationist when a trip has not been
approved, so ensure that they are descriptive enough to explain in simple terms which
condition failed to be met.
-
In the frame to the right of the Condition frame, provide the
following information as needed:
-
Select Apply to Reverse if the same eligibility test can be
applied when the Origin and Destination
information are reversed (for a return trip).
-
Select FXRoute if the eligibility test is applicable to an
FX route, and then click a solution set in the adjacent drop-down list.
This test requires PASS-IPA to be installed and set up.
-
Click a schedule period (Sched Period) in the list.
Normally, this setting is not required.
-
Type the minimum distance (Min Dist) a trip must travel to
match the requirements of the test.
-
Click a Purpose in the list.
-
Type the minimum number of days in advance (Min Adv Days)
that a trip must be booked.
-
Type the maximum number of days in advance (Max Adv Days)
that a trip must be booked.
-
Type or select a Client that trips must be applicable
to.
Trapeze recommends using general tests rather than client-specific tests when
possible. For example, a bus travel trained test could be specified as CH to CW and
reverse, rather than using specific addresses.
-
In the Elig. Before field, type the date that a client must
be already eligible by to book a trip.
This is commonly referred to as a grandfathered provision.
-
Select the days of the week (Weekdays) that the trip must be
scheduled on.
-
Select whether the trip must be in an ADA Service Area, and
then select the polygon type that represents the applicable service area.
This setting is labeled as such to indicate that polygons can have ADA polygon
day-of-week and time constraints.
-
Select whether to use a Custom eligibility test provided by
Trapeze.
Contact your Trapeze representative if additional customized test criteria are
required.
-
In the When frame, provide the following information as
needed:
-
Type the earliest date (From Date) from which the trip may
occur to match the test criteria.
-
Type the latest date (To Date) to which the trip may occur
to match the test criteria.
-
Type the earliest time (From Time) from which the trip may
occur to match the test criteria.
-
Type the latest time (To Time) to which the trip may occur
to match the test criteria.
-
In the Susp From field, type the start date from which the
trip date will temporarily fail to meet the test criteria.
-
In the Susp To field, type the end date after which the trip
date will no longer fail to meet the test criteria.
-
In the Origin and Destination frames, select
one of the options and then provide the needed information:
- Click an Address Type in the list, and then geocode the
address information.
- Click a Location Type in the list, and then type or select
the Location name.
- Click a Polygon Type in the list, and then click the
Polygon in the list.
- Type or select the Stop.
-
Click Add.
The test is listed in the grid at the bottom of the dialog box.