Adding Documents to Employee Records
Documents can be added directly to employee records.
The security permission must be granted to delete documents.
The security permission must be granted to edit documents.
The security permission must be granted to view documents.No security permission is needed to save documents locally.
- Bid Employee Documents. Attached in bidding screens (for example, in the Bidding screen) using the Attachment button in the screen toolbar. A record must be selected before you can add an attachment.
- Employee Documents. Attached in the main Employee Profile screen (employee card) by using the Attachments button in the detail view.
- Medical Test Documents. Attached in the Employee Profile screen under Medical Tests using the Attachments button in the detail view. A record must be created and selected before you can add an attachment.
- FMLA Certification Documents. Attached in the Employee Profile screen under FMLA Certifications using the Attachments button in the detail view. A record must be created and selected before you can add an attachment.
- Incident Documents. Attached in the Employee Profile screen under Incidents using the Attachments button in the detail view. A record must be created and selected before you can add an attachment.
- Investigation Documents. Attached in the OPS Incidents Admin screen, in the Investigation screen, by selecting the Incident Attachment button. An investigation must be saved before you can add an attachment.
- Performance Documents. Attached in the Employee Profile screen under Performance Summary using the Attachment button in the screen toolbar. A record must be selected before you can add an attachment. (Records can be created in the Performance Actions screen.)
- Absence Documents. Attached in the Employee Profile screen under Absence using the Attachments button in detail view. A record must be created and selected before you can add an attachment.
- Open the Employee Profile screen and set the Context (F3).
- Select an employee.
- Select Documents.
-
In detail view, right-click and select Add New
Record.
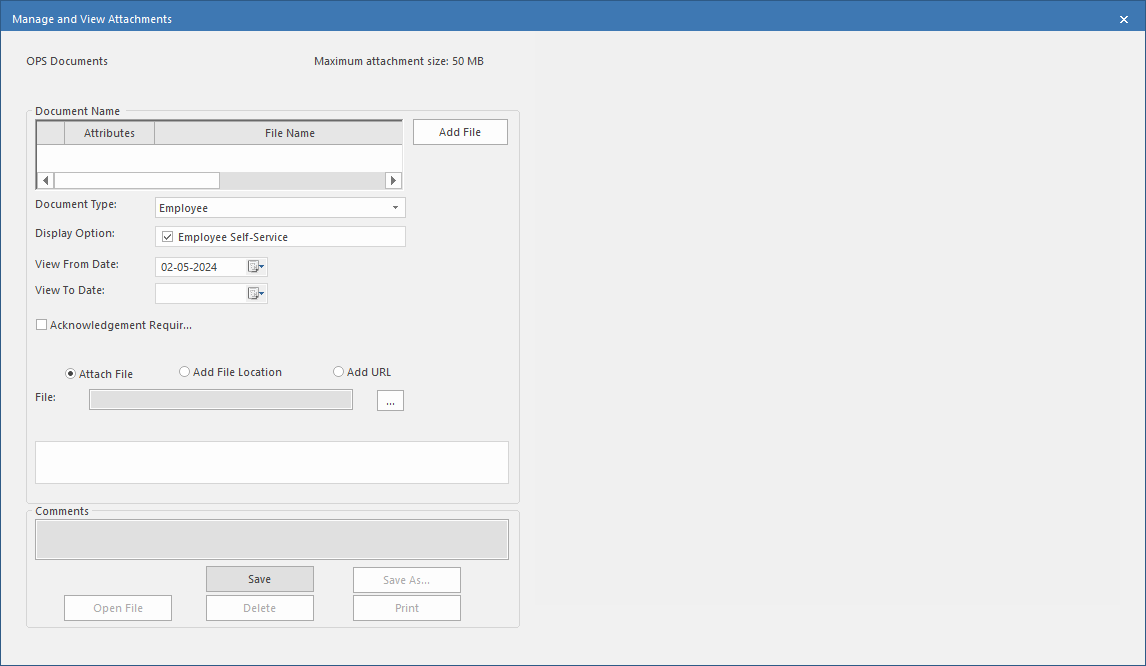
Maximum attachment size is defined in the property.The Manage and View Attachments dialog appears.
-
Select a Document Type.
If this is the first document added to the employee record, document types defined with a Source of Employee are visible.If Document Type isn't active, or if you are adding a secondary document, select Add File.The default settings for the document type are applied.
-
Select a Display Option, if applicable.
Any documents that require employee acknowledgement should have Employee Self-Service selected. (Employee Self-Service is an OPS add-on module.)
- Define the View From Date.
- Optional: If applicable, define the View To Date.
-
If the employee must acknowledge the document, select
Acknowledgement Required.
Any documents that require employee acknowledgement should have Employee Self-Service selected under Display Option. (Employee Self-Service is an OPS add-on.)Documents that require acknowledgement but haven't been acknowledged are marked with a red circle in the Attributes column.
-
Do one of the following:
- Attach File (adds the file to the database). Use the ellipsis button (…) to navigate to and select the file.
- Add File Location (defines the file location on your system). Use the ellipsis button (…) to navigate to and select the file location.
- Add URL (defines a URL and name to call the file in OPS). Enter a URL and Name to be used for the link.
- Select Save.
- Optional: Add any Comments and select Save.
- Optional: Select Save As... to save a copy of the selected document locally.
- Optional: Select Open File to open the selected document in another application.
-
Add another file (select Add File) or select x to
exit.
The document is visible in the employee record. You can view basic document information in the upper-left corner of the Manage and View Attachments dialog.
