Splitting Pieces of Work
Split pieces of work and assign different operators to each piece from the Daily Activity screen.
- Open the Daily Activity screen and set the Context (F3).
- Select the piece of work to split.
-
Select Split or Undo Split Work:

-
Do one of the following:
- To look up the split time based on a route location:
- In Work Details, select the time range for which to split the route.
- In Time Points, select the location and time
for splitting the route.
If splitting activity-based extra work, the ETime field is replaced with From Time, To Time, and Activity Name fields.
- Select Apply Time. The selected location and time appear in the Split Work area.
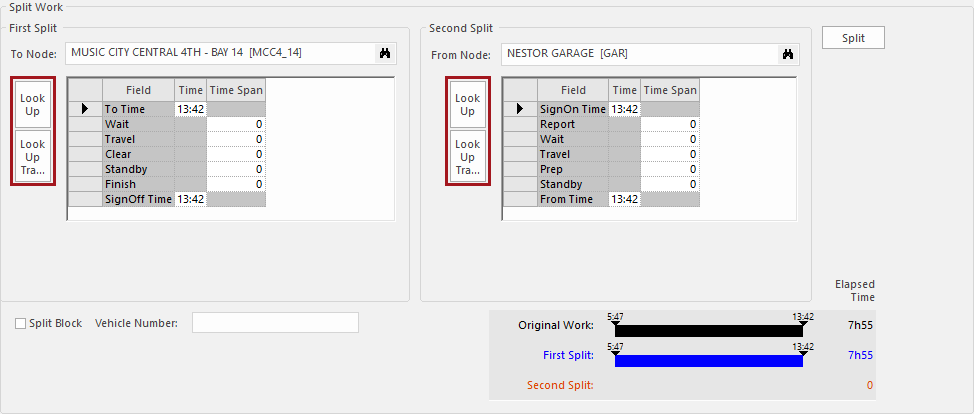
- To enter the split time manually, in the Split Work area, enter the To Time and From Time split time values. Default time values are populated from OPS Time Component Defaults ancillary data.
The lines and times at the bottom right of the dialog represent the original work and the pieces that would result from the split. - To look up the split time based on a route location:
-
If applicable, enter the Clear time for the first part
of the split work.
The difference between the Sign Off Time and the To Time is paid as clear (post-run) time.
-
If applicable, enter the Report time for the second part
of the split work.
The difference between the From Time and the Sign On Time is paid as report (pre-trip) time.
-
If operators are paid for travel time, enter values in the
Travel fields.
To show wait and travel times by selecting the Look Up button, the property must be selected.To show travel times by selecting on the Look Up Travel button, the property must be selected.
- If required, edit the SignOff Time and SignOn Time fields.
- If required, edit the Layover times.
- If required, edit Makeup times.
-
Do one of the following:
Option Purpose Reassign First Split Unassign the operator from the first part of the split work. Reassign Second Split Unassign the operator from the second part of the split work. -
If the vehicle must be replaced:
-
Select Split.
If the work you were splitting had assigned work, the Open Work dialog appears with the assigned employee's name in the Employee field.
-
In the dialog, do one of the following:
Option Description Open Current Piece Only Select this option if the employee will be absent only for the current piece of work. Open this and any subsequent Piece of (work name) which is currently assigned Select this option if the employee will be absent for all the pieces of the current work, but will be available for other work assigned to him later in the day. If multiple dates have been defined, a message appears asking you if this is a reoccurring absence or a continuous absence.
Open this piece and any other subsequent work that is currently assigned to this employee Select this option if the employee will be absent for the rest of day. This piece of the current work, subsequent pieces, and any other subsequent work assigned in the day are opened. If multiple dates have been defined, a message appears asking you if this is a reoccurring absence or a continuous absence.
Open ALL work that is currently assigned to this employee Select this option if the employee will be absent all day. It will open all work assigned to the employee for the day. This includes work with a start time earlier than the selected piece of work.
-
Select the Type of absence.
If the absence type ancillary data record has the Call In flag selected, the Call-In Date, Call-In Time, and Call-In Taker fields are automatically filled when the absence record is created.
- If a quota is specified for the absence type, select the appropriate Absence Quota.
-
Specify the time range of the absence in the
From Date, To Date, and
Time fields.
If you are reassigning the second split, the default From Time is the sign-off time from the first split. If you are reassigning the first split, the default To Time is the operators sign-on time for the second split. The From Date is the date set in the Context and can't be changed.
- If required, select an Accrual Year.
- If required, select a Reason.
-
If required, select a Relationship.
If the reason involves another person (for example, family sickness), this would be the employee's relationship to that person.
- Optional: Enter a Comment about the absence.
- Select OK.
- If the Accrual Balance screen shows accrual balance information, review it and then select OK.
- If a Conflicting work Assignments dialog shows pieces of work that will be opened, review them and select OK.
- If the employee has an absence alert as a result of the new absence, the Absence Alerts dialog appears. Select OK.